Category Archives: Filipino Food

21 Delicious Ways to Cook Filipino Adobo

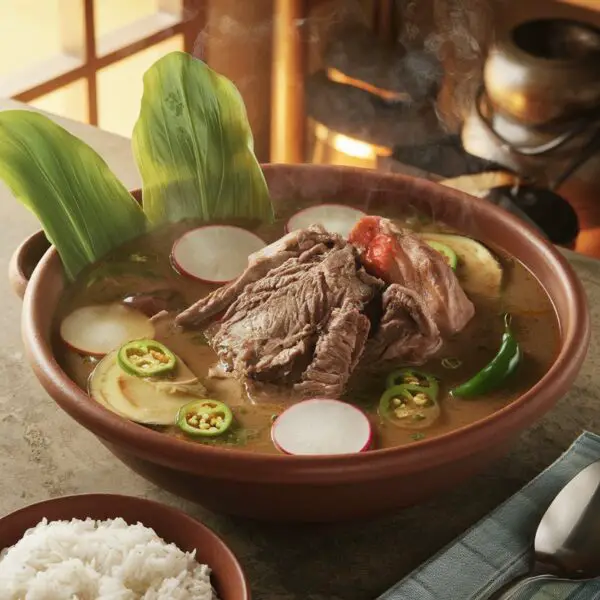
Filipino adobo is a beloved dish, showcasing a delightful balance of savory and tangy flavors that are sure to please your taste buds. With countless variations across the Philippines, this guide brings you 21 unique cooking methods to whip up this classic meal at home. From traditional to creative twists, there’s something for everyone to enjoy!

Adobo Flakes Tacos

Delicious adobo flakes tacos topped with cilantro and onions, served with lime wedges.

Adobo flakes tacos are a delicious twist on the classic Filipino dish. They feature tender, flavorful adobo, shredded and crisped to perfection, tucked into warm tortillas. The combination of savory and slightly tangy flavors makes every bite a treat!

This recipe is simple to follow, perfect for weeknight meals or casual get-togethers. With just a few ingredients, you can whip up tasty tacos that everyone will love.

Ingredients

  • 2 cups adobo-flavored meat (chicken or pork), shredded
  • 1 tablespoon oil
  • 8 small corn tortillas
  • 1/2 cup onions, thinly sliced
  • 1/2 cup fresh cilantro, chopped
  • 1 lime, cut into wedges
  • Optional: hot sauce for a spicy kick

Instructions

  1. Heat the oil in a pan over medium heat. Add the shredded adobo and cook until crispy, stirring occasionally.
  2. Warm the tortillas in a separate skillet or microwave until pliable.
  3. Assemble the tacos by placing a portion of the crispy adobo on each tortilla.
  4. Add sliced onions and chopped cilantro on top.
  5. Squeeze fresh lime juice over the tacos and add hot sauce if desired. Serve immediately and enjoy!

Pork Adobo with Coconut Milk

A bowl of Pork Adobo with Coconut Milk served with rice and garnished with cilantro.

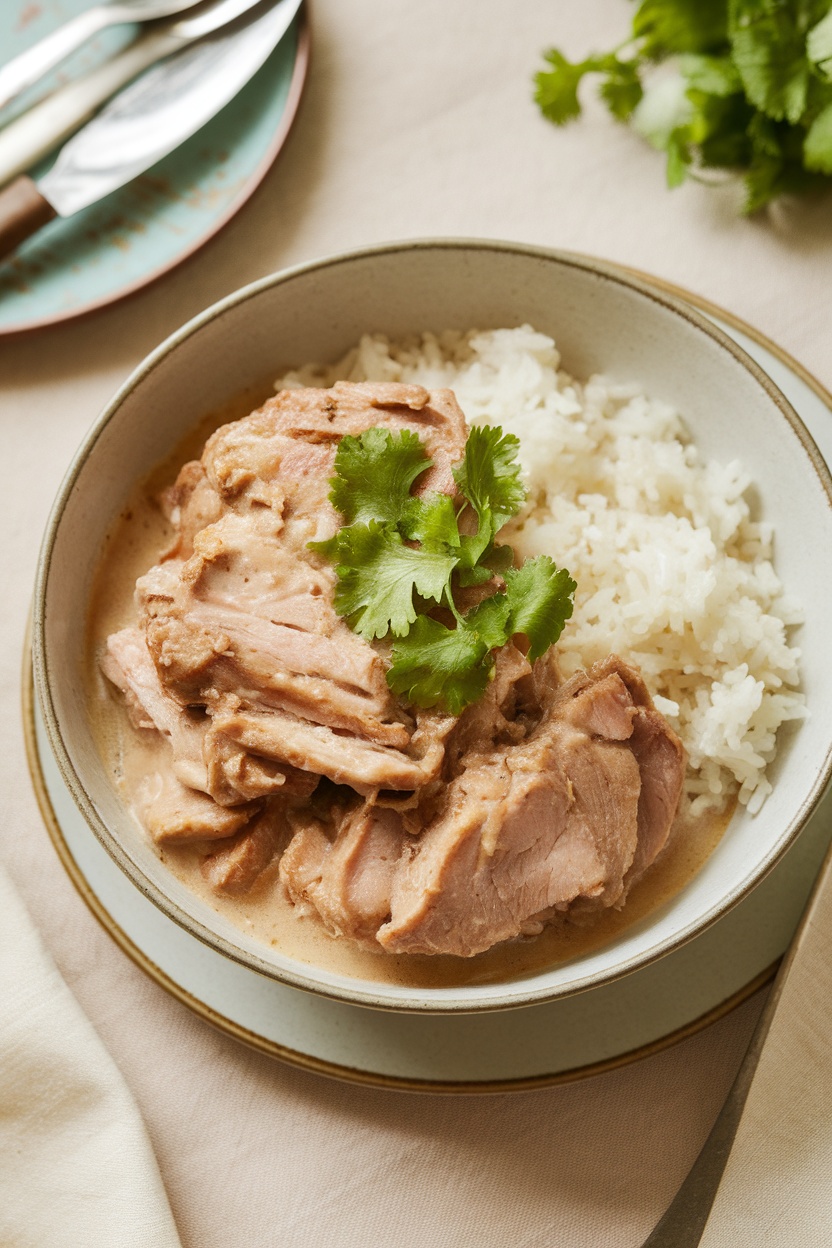
Pork Adobo with Coconut Milk is a delightful twist on the classic Filipino dish. The succulent pork melts in your mouth, while the rich coconut milk adds a creamy texture that complements the traditional adobo flavors beautifully. This recipe is simple to make, perfect for both novice cooks and seasoned chefs.

The combination of savory soy sauce, tangy vinegar, and aromatic spices creates a mouthwatering taste that will have everyone coming back for seconds. Serve it over a bed of fluffy rice, and you’ll have a comforting meal that’s sure to impress.

Ingredients

  • 2 lbs pork shoulder, cut into chunks
  • 1 cup coconut milk
  • 1/2 cup soy sauce
  • 1/2 cup vinegar
  • 1 onion, chopped
  • 6 cloves garlic, minced
  • 2 bay leaves
  • 1 tablespoon black peppercorns
  • Salt and pepper to taste
  • 1 tablespoon cooking oil
  • Cilantro for garnish

Instructions

  1. Heat cooking oil in a large pot over medium heat. Add chopped onions and minced garlic, sautéing until fragrant.
  2. Add the pork chunks and brown on all sides, about 5-7 minutes.
  3. Pour in the soy sauce and vinegar, and add bay leaves and black peppercorns. Let it simmer for 5 minutes without stirring.
  4. Stir everything together, then cover and cook on low heat for about 40 minutes, stirring occasionally.
  5. Pour in the coconut milk and continue to simmer for another 20 minutes or until the pork is tender. Season with salt and pepper to taste.
  6. Serve hot, garnished with cilantro, over steamed rice.

Adobo Fried Rice

A plate of Adobo Fried Rice topped with green onions and an egg.

Adobo Fried Rice is a fantastic dish that brings together the savory and tangy flavors of traditional Filipino adobo with the comforting texture of fried rice. It’s a simple yet satisfying recipe that transforms leftover adobo into a whole new meal. The rich taste of marinated meat combined with perfectly cooked rice makes it a hit for any occasion.

This dish is not only easy to whip up, but it also allows for creativity. You can toss in your favorite vegetables or even add an egg on top for extra protein. It’s perfect for a quick lunch or dinner, and you’ll love how it brightens up your plate with a pop of color and flavor.

Ingredients

  • 2 cups cooked rice (preferably day-old)
  • 1 cup leftover adobo (chicken or pork)
  • 1 tablespoon vegetable oil
  • 1 small onion, chopped
  • 1 bell pepper, diced
  • 1 carrot, diced
  • 2 green onions, sliced
  • 2 cloves garlic, minced
  • 1 tablespoon soy sauce
  • 1 egg (optional)

Instructions

  1. Heat the oil in a large skillet over medium heat. Sauté the onion and garlic until fragrant.
  2. Add the bell pepper and carrot, cooking until softened.
  3. Stir in the leftover adobo, breaking it apart as needed.
  4. Add the cooked rice, soy sauce, and mix everything well. Fry until heated through.
  5. If using, push the rice to the side of the pan and scramble the egg in the empty space until cooked. Mix it into the rice.
  6. Garnish with green onions before serving. Enjoy!

Traditional Chicken Adobo

A plate of traditional Chicken Adobo served with rice.

Traditional Chicken Adobo is a beloved Filipino dish known for its savory and tangy flavors. The combination of vinegar, soy sauce, garlic, and spices creates a rich, aromatic sauce that beautifully coats the tender chicken. This dish is not only delicious but also simple to prepare, making it a staple in many Filipino households.

Cooking Chicken Adobo is all about balancing the ingredients. The vinegar adds a nice tang, while the soy sauce brings depth. Simmering the chicken in this mixture allows it to absorb all those wonderful flavors. Serve it over steamed rice to soak up every bit of the sauce, and you’ve got a meal that’s sure to impress.

Ingredients

  • 2 pounds chicken, cut into pieces
  • 1/2 cup soy sauce
  • 1/2 cup vinegar
  • 1 head garlic, minced
  • 1 onion, sliced
  • 2-3 bay leaves
  • 1 teaspoon black peppercorns
  • 2 tablespoons cooking oil
  • 1/2 cup water
  • Salt to taste

Instructions

  1. Marinate the chicken: In a bowl, combine chicken pieces, soy sauce, minced garlic, and bay leaves. Let it marinate for at least 30 minutes.
  2. Heat the oil: In a large pot, heat the cooking oil over medium heat. Add the sliced onion and sauté until translucent.
  3. Brown the chicken: Add the marinated chicken to the pot, including the marinade. Cook until the chicken is browned on all sides.
  4. Add vinegar: Pour in the vinegar and let it simmer without stirring for about 5 minutes to cook off the strong vinegar taste.
  5. Simmer: Add water and black peppercorns, then cover and simmer for about 30 minutes, or until the chicken is tender. Season with salt to taste.
  6. Serve: Once cooked, serve the Chicken Adobo hot over steamed rice. Enjoy!

Seafood Adobo with Shrimp

A bowl of shrimp adobo with bell peppers and lemon slices

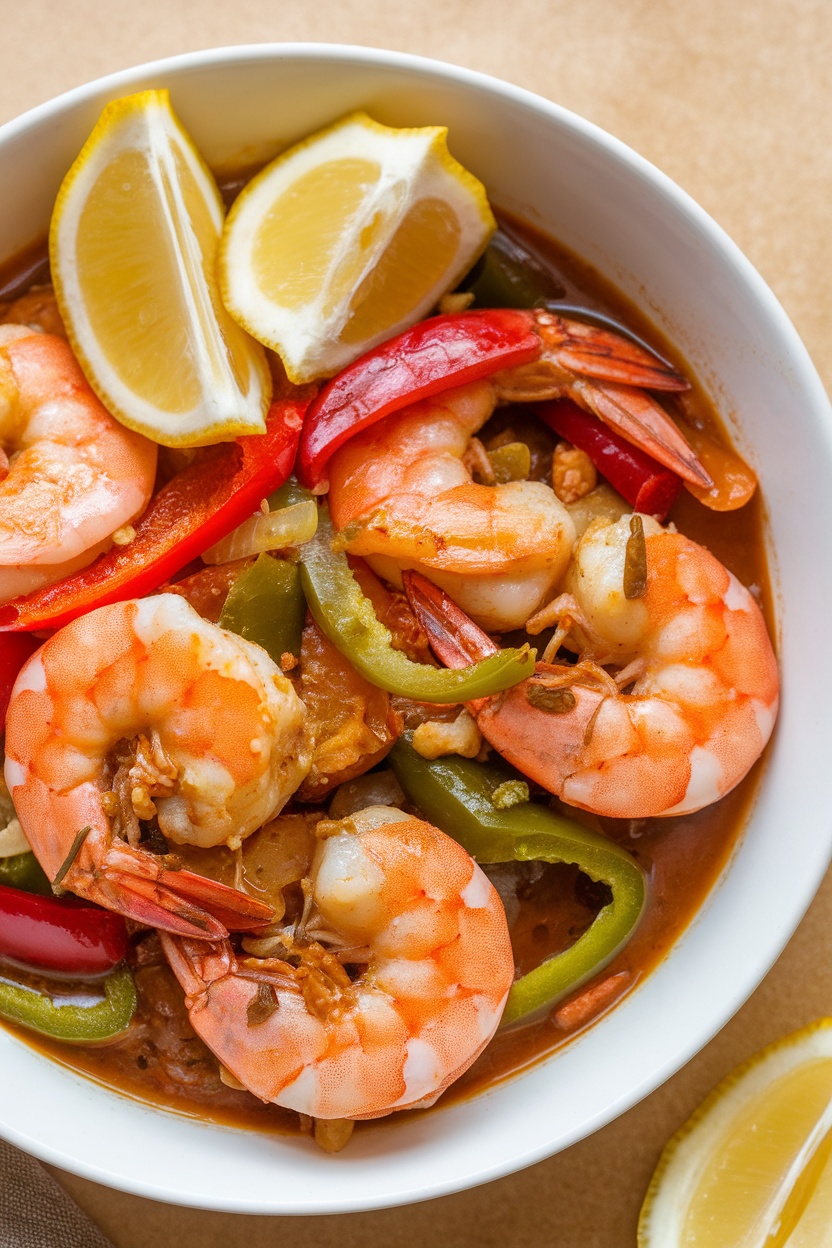
Seafood adobo with shrimp is a delightful twist on the classic Filipino dish. This version combines the savory flavors of shrimp with a tangy, slightly sweet sauce, making each bite a burst of taste. The combination of soy sauce, vinegar, and spices creates a rich, umami-packed sauce that beautifully complements the seafood.

Preparing this dish is straightforward and perfect for both seafood lovers and those looking to try something new. With fresh ingredients and a few simple steps, you can whip up a meal that’s sure to impress family and friends. Plus, it’s a great way to enjoy shrimp in a different light!

Ingredients

  • 1 pound large shrimp, peeled and deveined
  • 2 tablespoons vegetable oil
  • 1 medium onion, sliced
  • 3 cloves garlic, minced
  • 1 bell pepper, sliced (green or red)
  • 1 cup water
  • 1/2 cup soy sauce
  • 1/4 cup vinegar
  • 1 tablespoon brown sugar
  • 1 teaspoon black peppercorns
  • 2-3 bay leaves
  • Salt to taste
  • Lemon wedges for serving

Instructions

  1. Heat the vegetable oil in a large pan over medium heat. Sauté the onions and garlic until fragrant.
  2. Add the shrimp and cook until they turn pink, about 2-3 minutes.
  3. Stir in the bell pepper, and cook for another minute.
  4. Pour in the water, soy sauce, vinegar, and add the brown sugar, peppercorns, and bay leaves. Bring to a boil.
  5. Reduce heat and let it simmer for about 10-15 minutes. Adjust seasoning with salt if needed.
  6. Serve warm with lemon wedges on the side.

Adobo Pasta with Garlic

A delicious plate of Adobo Pasta with Garlic, featuring fettuccine coated in a savory sauce, garnished with parsley and cheese.

Adobo Pasta with Garlic combines the rich and savory flavors of traditional Filipino adobo with the comforting appeal of pasta. This dish offers a unique twist, blending tender noodles with a sauce that is both tangy and aromatic, thanks to the garlic and soy sauce. It’s super simple to whip up, making it a fantastic option for a quick weeknight dinner or a cozy weekend meal.

The taste is a delightful fusion of umami from the adobo and the garlicky goodness that coats every strand of pasta. You’ll find that this recipe not only satisfies your cravings but also impresses your family and friends with its bold flavors!

Ingredients

  • 8 oz fettuccine or your choice of pasta
  • 1 cup cooked chicken or pork adobo, shredded
  • 2 tablespoons olive oil
  • 6 cloves garlic, minced
  • 1/2 cup onion, diced
  • 1 cup tomato sauce
  • 1 tablespoon soy sauce
  • Salt and pepper to taste
  • Fresh parsley, chopped (for garnish)
  • Grated cheese (optional)

Instructions

  1. Cook the Pasta: In a large pot, bring salted water to a boil. Add the pasta and cook according to package instructions until al dente. Drain and set aside.
  2. Sauté Garlic and Onion: In a large skillet, heat olive oil over medium heat. Add minced garlic and diced onion. Sauté until the onion is translucent and the garlic is fragrant.
  3. Add Adobo and Sauce: Stir in the shredded adobo, tomato sauce, and soy sauce. Allow the mixture to simmer for about 5 minutes, letting the flavors meld together. Season with salt and pepper to taste.
  4. Combine with Pasta: Add the cooked pasta to the skillet, tossing to coat the noodles with the sauce. Cook for an additional 2-3 minutes to heat through.
  5. Serve: Plate the pasta and garnish with chopped parsley and grated cheese, if desired. Enjoy your delicious Adobo Pasta with Garlic!

Beef Adobo with Pineapple

A bowl of Beef Adobo with Pineapple served with rice and garnished with cilantro.

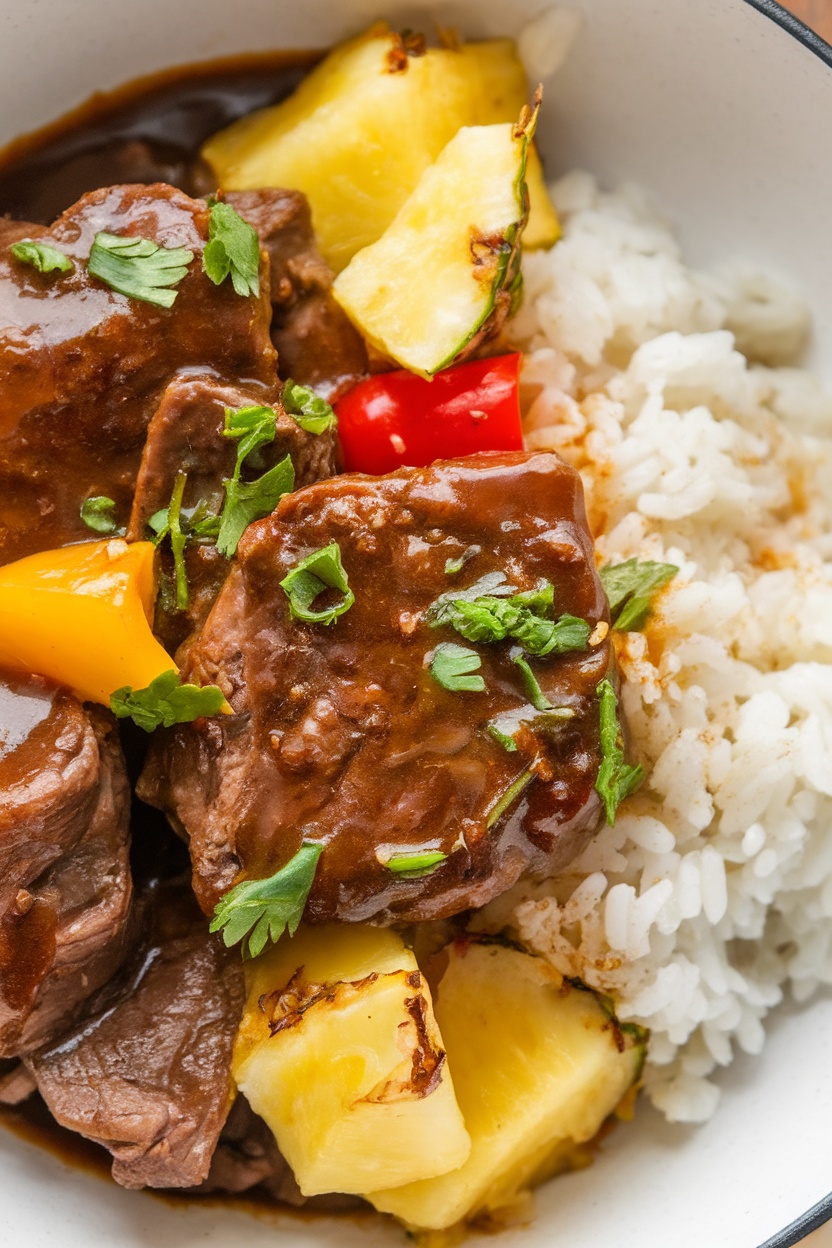
This Beef Adobo with Pineapple is a delightful twist on the traditional Filipino dish, blending savory, tangy, and sweet flavors. The beef becomes tender and infused with a rich soy sauce base, while the pineapple adds a refreshing sweetness that balances the dish perfectly. It’s an easy recipe that’s sure to impress, making it a great choice for family dinners or special occasions.

The combination of the juicy beef and caramelized pineapple creates a mouthwatering flavor that pairs wonderfully with steamed rice. Whether you’re a seasoned cook or trying your hand at Filipino cuisine for the first time, this recipe is simple yet satisfying.

Ingredients

  • 2 pounds beef chuck, cut into cubes
  • 1 cup soy sauce
  • 1/2 cup vinegar
  • 1 cup pineapple chunks (fresh or canned)
  • 1 onion, sliced
  • 4 cloves garlic, minced
  • 2 bay leaves
  • 1 teaspoon black pepper
  • 1 tablespoon sugar
  • 1 tablespoon cooking oil
  • 1 cup water
  • Chopped cilantro for garnish

Instructions

  1. Marinate the Beef: In a bowl, combine the beef, soy sauce, vinegar, minced garlic, and bay leaves. Let it marinate for at least 30 minutes, or up to overnight in the fridge for more flavor.
  2. Cook the Beef: In a large pot, heat cooking oil over medium heat. Add the sliced onions and sauté until translucent. Add the marinated beef (reserve the marinade) and cook until browned on all sides.
  3. Add Liquids: Pour in the reserved marinade, pineapple chunks, sugar, black pepper, and water. Stir well and bring to a boil.
  4. Simmer: Reduce heat to low, cover, and let it simmer for about 1.5 hours, or until the beef is tender. You can add more water if necessary to prevent burning.
  5. Finish: Once the beef is tender, taste and adjust seasoning if needed. Serve hot over steamed rice and garnish with chopped cilantro.

Vegetarian Adobo with Tofu

A delicious vegetarian adobo with tofu and colorful vegetables.

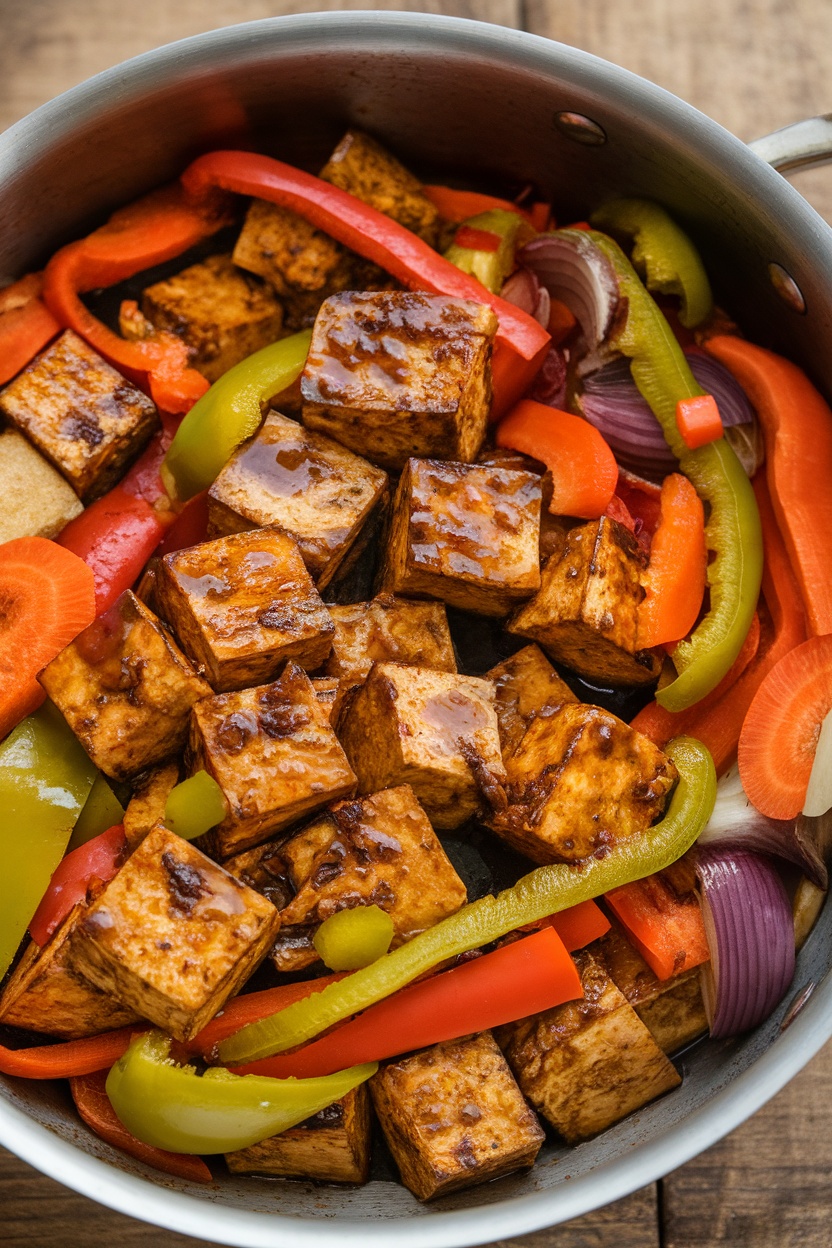
Vegetarian Adobo with Tofu is a delightful twist on the classic Filipino dish. This version combines the savory flavors of soy sauce, vinegar, and garlic with tender pieces of tofu and vibrant vegetables, creating a dish that is both hearty and satisfying. It’s a wonderful option for those looking to enjoy a meat-free meal while still indulging in the rich taste that adobo is known for.

This recipe is simple to make, making it perfect for weeknight dinners or meal prep. The tofu absorbs the flavors beautifully, and the colorful veggies add a nice crunch. Serve it over rice for a complete meal that everyone will love.

Ingredients

  • 1 block firm tofu, drained and pressed
  • 2 tablespoons soy sauce
  • 1/4 cup vinegar (cane or rice vinegar works well)
  • 4 cloves garlic, minced
  • 1 onion, sliced
  • 1 red bell pepper, sliced
  • 1 green bell pepper, sliced
  • 1 carrot, julienned
  • 1 tablespoon vegetable oil
  • 1 teaspoon black pepper
  • 1 bay leaf
  • 1 cup water
  • Cooked rice, for serving

Instructions

  1. Prepare the Tofu: Cut the pressed tofu into cubes. In a bowl, marinate the tofu with soy sauce, garlic, and black pepper for about 15 minutes.
  2. Sauté the Vegetables: In a large pan, heat the vegetable oil over medium heat. Add the onion and sauté until translucent. Add the marinated tofu and cook until golden brown on all sides.
  3. Add Other Ingredients: Once the tofu is cooked, add the sliced bell peppers, carrot, vinegar, bay leaf, and water. Stir everything together and bring to a boil.
  4. Simmer: Lower the heat and let it simmer for about 15-20 minutes, allowing the flavors to meld and the sauce to slightly thicken.
  5. Serve: Remove the bay leaf before serving. Serve the vegetarian adobo hot over a bed of rice.

Adobo Potatoes

Deliciously cooked adobo potatoes with herbs.

Adobo potatoes are a delightful twist on the classic Filipino adobo, merging the rich, tangy flavors of the sauce with tender, creamy potatoes. This dish is simple to prepare and makes for a comforting side that pairs beautifully with rice or can be enjoyed on its own. The warmth of soy sauce and vinegar blend perfectly with the natural sweetness of the potatoes, creating a flavor that is both savory and satisfying.

Cooking adobo potatoes is a breeze, making it a great option for weeknight dinners or special occasions. The ingredients are straightforward, and you can have this dish ready in no time, filling your home with mouthwatering aromas that invite everyone to the table.

Ingredients

  • 1.5 pounds small potatoes, halved
  • 1 cup soy sauce
  • 1/2 cup vinegar (white or cane)
  • 1 onion, sliced
  • 5 cloves garlic, minced
  • 2 bay leaves
  • 1 tablespoon brown sugar
  • 1/2 teaspoon black pepper
  • 1 tablespoon cooking oil
  • Fresh parsley, chopped (for garnish)

Instructions

  1. Prepare the Potatoes: In a pot of boiling salted water, cook the halved potatoes until just tender, about 10-12 minutes. Drain and set aside.
  2. Make the Sauce: In a large pan, heat the cooking oil over medium heat. Sauté the onions and garlic until fragrant and translucent.
  3. Add the Ingredients: Stir in the soy sauce, vinegar, bay leaves, brown sugar, and black pepper. Bring the mixture to a gentle simmer.
  4. Combine: Add the boiled potatoes to the pan and stir to coat them well in the sauce. Let it simmer on low heat for about 15-20 minutes, allowing the potatoes to absorb the flavors.
  5. Serve: Garnish with chopped parsley before serving. Enjoy your adobo potatoes warm, either as a side dish or a main attraction!

Crispy Adobo Wings

Plate of crispy adobo wings served with dipping sauce and celery sticks.

Crispy Adobo Wings combine the rich, savory flavors of traditional Filipino adobo with the satisfying crunch of perfectly fried chicken wings. The marinade, which includes soy sauce, vinegar, and a blend of spices, infuses the wings with a delightful taste that keeps you coming back for more. This recipe is not only simple to make but also a crowd-pleaser at any gathering.

These wings are marinated to perfection, then fried until golden brown, offering a crispy exterior that contrasts beautifully with the tender meat inside. Pair them with your favorite dipping sauce for an irresistible snack or appetizer!

Ingredients

  • 2 lbs chicken wings
  • 1/2 cup soy sauce
  • 1/4 cup vinegar (white or cane vinegar)
  • 5 cloves garlic, minced
  • 1 teaspoon black pepper
  • 1 teaspoon paprika
  • 1 tablespoon brown sugar
  • 1/2 teaspoon salt
  • Oil for frying

Instructions

  1. Marinate the Wings: In a large bowl, combine soy sauce, vinegar, minced garlic, black pepper, paprika, brown sugar, and salt. Add the chicken wings and ensure they are well coated. Cover and marinate in the refrigerator for at least 1 hour, or overnight for deeper flavor.
  2. Prepare for Frying: Heat oil in a deep pan over medium heat. Make sure there’s enough oil to fully submerge the wings.
  3. Fry the Wings: Remove the wings from the marinade and let any excess liquid drip off. Carefully place the wings in the hot oil, frying in batches to avoid overcrowding. Cook for about 8-10 minutes or until golden brown and crispy, flipping halfway through.
  4. Drain and Serve: Once cooked, remove the wings from the oil and place them on a paper towel-lined plate to drain excess oil. Serve hot with your favorite dipping sauce, like garlic mayo or spicy vinegar.

Adobo Quinoa Salad

Colorful quinoa salad with chicken, tomatoes, and avocado

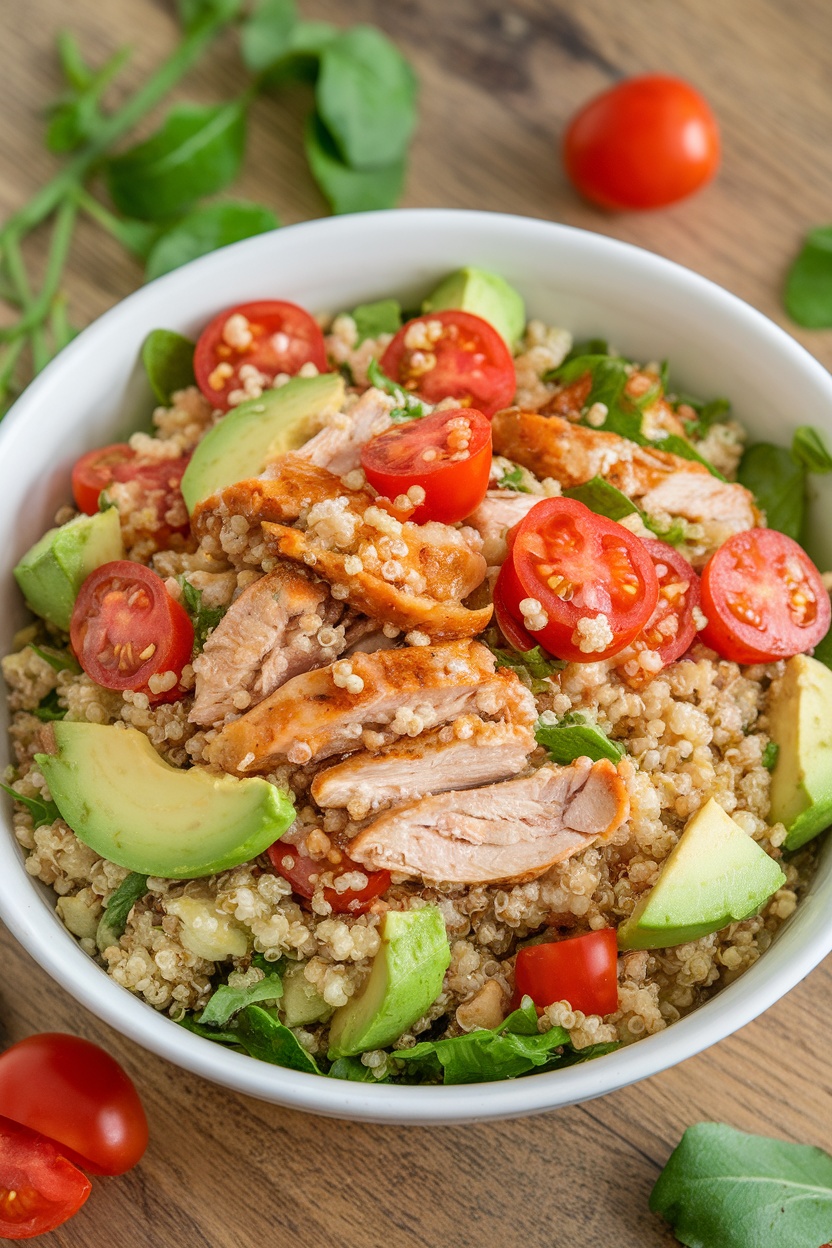
Adobo Quinoa Salad is a refreshing twist on the classic Filipino dish. This salad combines the savory flavors of adobo with the nutty texture of quinoa, making it a satisfying and nutritious meal. It’s perfect for lunch or as a side dish at dinner.

The salad is easy to prepare and packed with vibrant ingredients like cherry tomatoes and creamy avocado. The blend of spices from the adobo enhances the quinoa, giving every bite a burst of flavor. Whether you’re looking for a hearty meal or a light treat, this salad hits the spot.

Ingredients

  • 1 cup quinoa
  • 2 cups water
  • 1 lb chicken thighs, cooked and shredded
  • 1/2 cup cherry tomatoes, halved
  • 1 avocado, diced
  • 1 cup fresh spinach, chopped
  • 2 tablespoons soy sauce
  • 1 tablespoon vinegar
  • 1 tablespoon olive oil
  • 1 teaspoon garlic powder
  • Salt and pepper to taste

Instructions

  1. Rinse the quinoa under cold water. In a saucepan, bring water to a boil and add the quinoa. Reduce heat, cover, and simmer for 15 minutes or until water is absorbed. Fluff with a fork and let cool.
  2. In a large bowl, combine the shredded chicken with soy sauce, vinegar, garlic powder, salt, and pepper. Toss until chicken is evenly coated.
  3. Once the quinoa has cooled, add it to the bowl with the chicken mixture. Stir in cherry tomatoes, avocado, and spinach.
  4. Drizzle with olive oil, toss gently, and adjust seasoning if needed. Serve chilled or at room temperature.

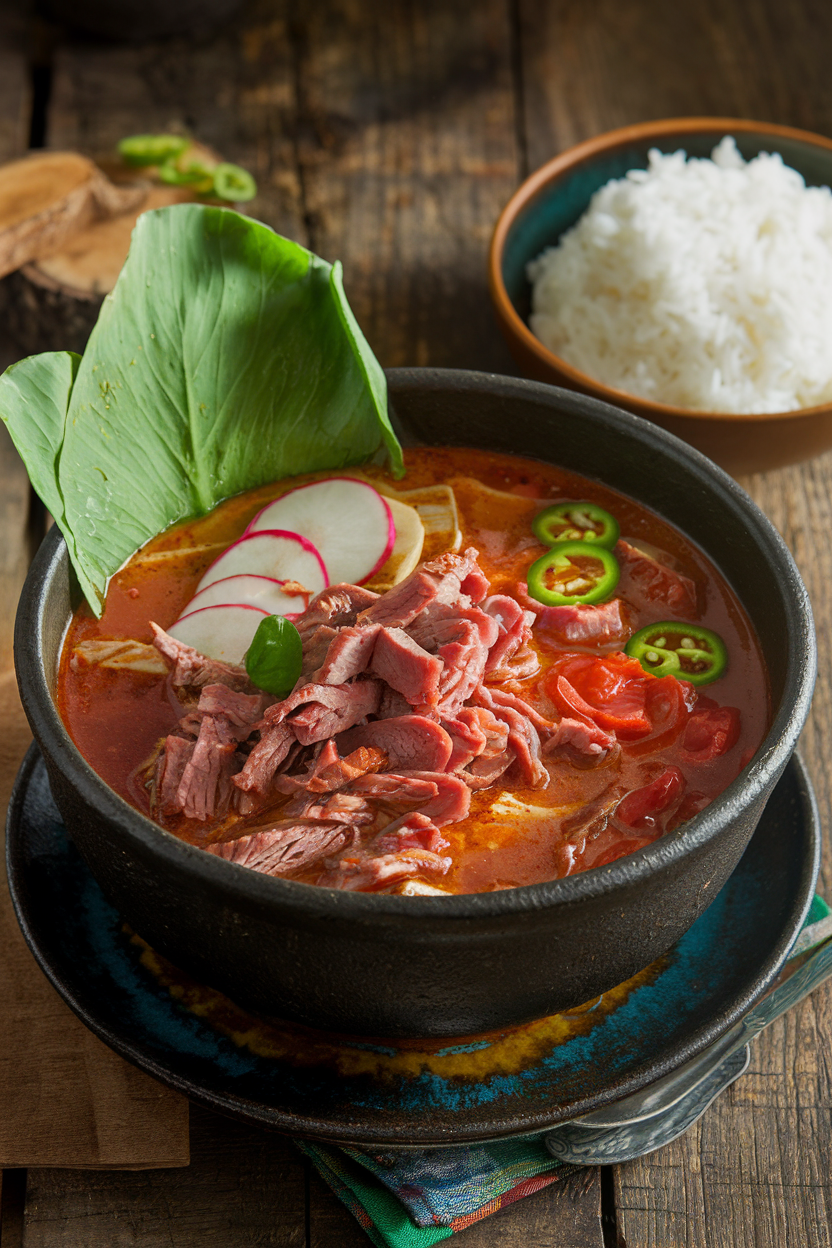
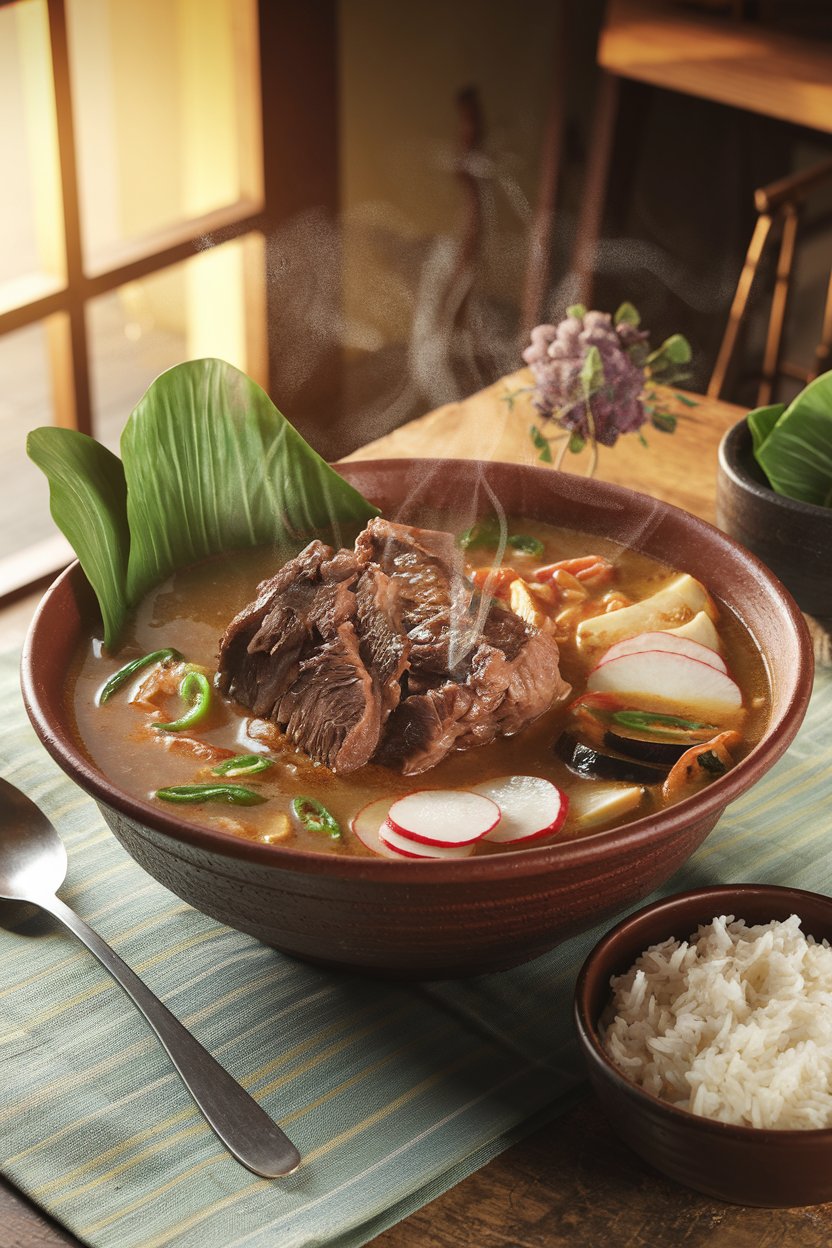
Adobo Soup with Vegetables

A bowl of adobo soup with chicken and vegetables

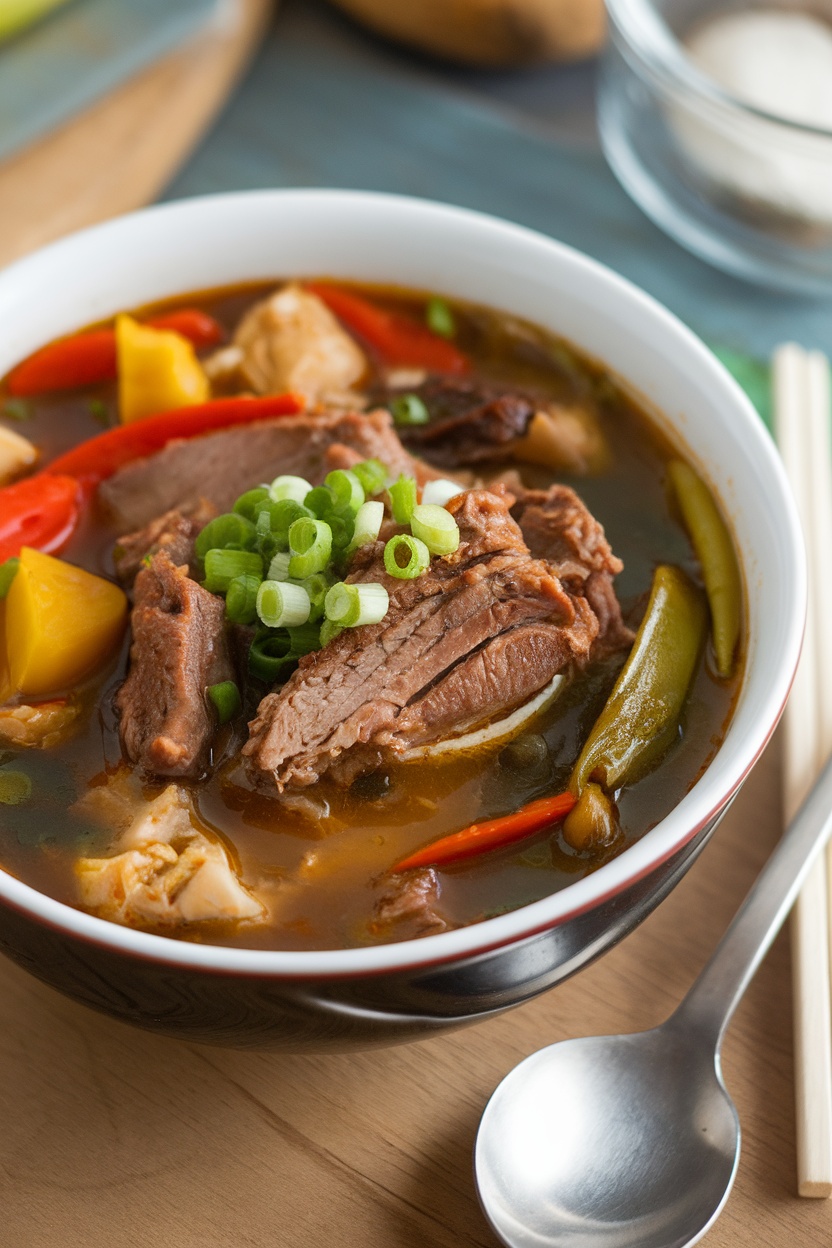
Adobo soup with vegetables is a comforting dish that combines the rich, savory flavors of traditional Filipino adobo with a light and nourishing broth. It’s a delightful twist on the classic adobo, perfect for warming you up on a chilly day. The tender meat, combined with fresh vegetables, creates a wholesome meal that is both satisfying and easy to prepare.

This recipe is simple enough for anyone to tackle, making it an excellent option for a weeknight dinner. The blend of soy sauce, vinegar, and spices gives the soup a delicious tang, while the veggies add color and nutrients. Once you try this version of adobo, you might find yourself craving it regularly!

Ingredients

  • 1 lb chicken thighs, bone-in
  • 4 cups chicken broth
  • 1 medium onion, chopped
  • 4 cloves garlic, minced
  • 1 cup potatoes, diced
  • 1 cup bell peppers, sliced
  • 1 cup green beans, trimmed
  • 1/4 cup soy sauce
  • 1/4 cup vinegar
  • 2 tablespoons cooking oil
  • 1 teaspoon black pepper
  • 2 green onions, chopped (for garnish)

Instructions

  1. In a large pot, heat the cooking oil over medium heat. Sauté the onion and garlic until fragrant.
  2. Add the chicken thighs and cook until browned on all sides.
  3. Pour in the soy sauce, vinegar, and black pepper. Allow it to simmer for about 5 minutes.
  4. Add the chicken broth and potatoes. Bring to a boil, then reduce heat to low and cover. Cook for 20 minutes.
  5. Add the bell peppers and green beans. Continue to simmer for another 10 minutes, or until the vegetables are tender.
  6. Serve hot, garnished with chopped green onions.

Adobo Pizza with Fresh Basil

Adobo pizza topped with shredded chicken and fresh basil

Adobo pizza combines two beloved cuisines into a delicious and satisfying dish. The savory flavors of Filipino adobo, typically made with marinated meat, meld beautifully with the cheese and tomato base of a classic pizza. This recipe is not only full of flavor but also simple enough to make for a weeknight dinner or a fun gathering with friends.

The smoky, tangy taste of the adobo sauce pairs perfectly with the gooey cheese and a hint of freshness from the basil. You’ll love how the familiar flavors of adobo give a unique twist to pizza, making it a hit for everyone at the table.

Ingredients

  • 1 pre-made pizza crust
  • 1 cup cooked adobo chicken, shredded
  • 1 cup pizza sauce
  • 1 1/2 cups mozzarella cheese, shredded
  • 1/4 cup fresh basil leaves
  • 1 tablespoon olive oil
  • Salt and pepper to taste

Instructions

  1. Preheat your oven to 475°F (245°C).
  2. Roll out the pizza crust on a floured surface and transfer to a baking sheet or pizza stone.
  3. Spread the pizza sauce evenly over the crust.
  4. Top with shredded mozzarella cheese, leaving some edges for the crust.
  5. Add the shredded adobo chicken on top of the cheese.
  6. Drizzle olive oil over the pizza and season with salt and pepper.
  7. Bake in the preheated oven for about 12-15 minutes, or until the cheese is bubbly and the crust is golden brown.
  8. Remove from the oven and sprinkle fresh basil leaves on top before slicing and serving.

Adobo Stuffed Bell Peppers

Colorful adobo stuffed bell peppers topped with cheese on a plate.

Adobo stuffed bell peppers bring a delightful twist to the classic Filipino dish. This recipe combines the rich, savory flavors of adobo with the freshness of bell peppers, creating a colorful and satisfying meal. It’s an easy dish to prepare, making it perfect for a weeknight dinner or a special occasion.

The peppers are filled with a mixture of marinated meat, rice, and spices, then topped with cheese for that extra layer of goodness. Each bite offers a burst of flavor and texture that highlights the essence of adobo while being both fun and visually appealing.

Ingredients

  • 4 large bell peppers (any color)
  • 1 lb chicken or pork, cubed
  • 1 cup cooked rice
  • 1/4 cup soy sauce
  • 1/4 cup vinegar
  • 4 cloves garlic, minced
  • 1 onion, chopped
  • 1 teaspoon black pepper
  • 1 teaspoon bay leaves, crushed
  • 1 cup shredded cheese (cheddar or mozzarella)
  • 2 tablespoons olive oil
  • Salt to taste

Instructions

  1. Preheat the oven to 375°F (190°C).
  2. In a bowl, combine the meat with soy sauce, vinegar, garlic, onion, pepper, and bay leaves. Marinate for at least 30 minutes.
  3. In a skillet, heat olive oil over medium heat. Sauté the marinated meat until cooked through, about 10-15 minutes. Add cooked rice and mix well.
  4. Cut the tops off the bell peppers and remove the seeds. Stuff each pepper with the adobo rice mixture.
  5. Place the stuffed peppers in a baking dish. Sprinkle cheese on top of each pepper.
  6. Bake for 25-30 minutes until the peppers are tender and the cheese is melted and bubbly.
  7. Let cool slightly before serving. Enjoy your adobo stuffed bell peppers!

Adobo Casserole with Cheese

A hearty Adobo casserole topped with melted cheese and garnished with green onions.

This Adobo Casserole with Cheese combines the classic flavors of Filipino adobo with the comforting layers of a casserole. The tangy and savory taste of the adobo pairs perfectly with melted cheese, making it a delightful dish that appeals to both traditionalists and those looking for something new. Plus, it’s pretty straightforward to make, making it ideal for a family dinner or a potluck.

The casserole is loaded with tender chicken, rich sauce, and gooey cheese, creating a harmonious blend of flavors that everyone will love. It’s a simple one-pan meal that you can prepare ahead of time and bake when you’re ready to serve, which is a real bonus for busy weeknights!

Ingredients

  • 2 lbs chicken thighs, cut into pieces
  • 1/2 cup soy sauce
  • 1/2 cup vinegar
  • 1 head of garlic, minced
  • 1 onion, chopped
  • 2 bay leaves
  • 1 teaspoon black pepper
  • 1 cup chicken broth
  • 3 cups cooked pasta (penne or macaroni)
  • 2 cups shredded cheese (cheddar and mozzarella mix)
  • 1/4 cup chopped green onions for garnish

Instructions

  1. Marinate the Chicken: In a large bowl, combine chicken, soy sauce, vinegar, minced garlic, onion, bay leaves, and black pepper. Let it marinate for at least 30 minutes.
  2. Cook the Chicken: In a large skillet, cook the marinated chicken over medium heat until browned. Add chicken broth and simmer for about 30 minutes until the chicken is tender.
  3. Prepare the Casserole: Preheat your oven to 350°F (175°C). In a baking dish, mix the cooked pasta with the chicken and sauce until well combined.
  4. Add Cheese: Top the pasta mixture with shredded cheese, ensuring it’s evenly spread.
  5. Bake: Place the casserole in the preheated oven and bake for 20-25 minutes, or until the cheese is melted and bubbly.
  6. Garnish: Remove from the oven and sprinkle with chopped green onions before serving.

Adobo Burger with Garlic Aioli

Adobo burger served with lettuce and garlic aioli on a plate.

This Adobo Burger with Garlic Aioli brings a delightful twist to the classic burger. The savory flavors of Filipino adobo are infused into a juicy burger patty, creating a unique and satisfying meal. The garlic aioli adds a creamy kick that complements the rich taste of the adobo, making each bite extra special.

What’s great about this recipe is that it’s easy to prepare and perfect for any cook, whether you’re just starting out or you’re a kitchen pro. With simple ingredients and straightforward steps, you’ll have a delicious burger that’s sure to impress your friends and family.

Ingredients

  • 1 lb ground beef
  • 2 tablespoons soy sauce
  • 2 tablespoons vinegar
  • 4 cloves garlic, minced
  • 1 teaspoon black pepper
  • 1 tablespoon olive oil
  • 4 burger buns
  • 1 cup lettuce leaves
  • 1/2 cup mayonnaise
  • 1 tablespoon lemon juice
  • 1 teaspoon garlic powder

Instructions

  1. In a bowl, combine the ground beef, soy sauce, vinegar, minced garlic, and black pepper. Mix until well incorporated.
  2. Form the mixture into four equal patties.
  3. Heat olive oil in a skillet over medium heat. Cook the patties for about 5-6 minutes on each side or until they reach your desired doneness.
  4. While the burgers cook, prepare the garlic aioli by mixing mayonnaise, lemon juice, and garlic powder in a small bowl.
  5. Once the patties are cooked, toast the burger buns lightly in the skillet or oven.
  6. Assemble the burgers by placing a lettuce leaf on the bottom bun, followed by the cooked patty and a generous dollop of garlic aioli. Top with the other half of the bun and serve immediately.

Adobo Salad with Avocado Dressing

A vibrant adobo salad topped with creamy avocado dressing.

This Adobo Salad with Avocado Dressing is a fresh and vibrant twist on a classic Filipino dish. Combining tender adobo chicken with crisp greens and a creamy avocado dressing, this salad is both satisfying and nutritious. It’s simple to whip up, making it perfect for a quick lunch or a light dinner.

The blend of flavors is delightful, with the savory adobo complementing the creamy, zesty dressing. Whether you’re an adobo fan or new to the dish, this salad is sure to impress. It’s not just a meal; it’s an experience that highlights the essence of Filipino cuisine.

Ingredients

  • 2 cups mixed salad greens
  • 1 cup cooked chicken adobo, sliced
  • 1 avocado, sliced
  • 1/2 cup cherry tomatoes, halved
  • 2 green onions, chopped
  • 1/4 cup cilantro leaves
  • 1/4 cup Greek yogurt
  • 1 ripe avocado
  • 1 tablespoon lime juice
  • 1 teaspoon garlic powder
  • Salt and pepper to taste

Instructions

  1. Prepare the Dressing: In a blender, combine Greek yogurt, ripe avocado, lime juice, garlic powder, salt, and pepper. Blend until smooth and creamy. Adjust seasoning to taste.
  2. Assemble the Salad: On a large plate, arrange the mixed greens. Top with sliced adobo chicken, avocado slices, cherry tomatoes, and chopped green onions.
  3. Dress the Salad: Drizzle the avocado dressing generously over the salad. Garnish with cilantro leaves.
  4. Serve: Enjoy immediately while fresh!

Adobo Nachos with Cheese Sauce

Delicious adobo nachos topped with cheese sauce and jalapeño slices

Adobo nachos bring a delightful twist to a classic dish, combining the rich flavors of Filipino adobo with the crunchy goodness of tortilla chips. The tangy, savory taste of marinated meat layered over crispy chips creates a satisfying snack or appetizer that’s sure to please any crowd. Plus, the melty cheese sauce adds an extra creaminess that elevates the entire experience.

This recipe is simple to make, perfect for gatherings or a cozy movie night at home. With just a few ingredients and steps, you can whip up a batch of these scrumptious nachos in no time. Get ready for a flavor explosion!

Ingredients

  • 2 cups cooked adobo meat, shredded
  • 1 bag tortilla chips
  • 1 cup shredded cheese (cheddar or your choice)
  • 1 cup cheese sauce
  • 1 jalapeño, sliced (optional)
  • Fresh cilantro, chopped (for garnish)

Instructions

  1. Prepare the Oven: Preheat your oven to 350°F (175°C).
  2. Layer the Chips: Spread the tortilla chips evenly on a baking sheet lined with parchment paper.
  3. Add Adobo: Evenly distribute the shredded adobo meat over the chips.
  4. Top with Cheese: Sprinkle the shredded cheese generously over the top of the nachos.
  5. Bake: Place the baking sheet in the oven and bake for about 10-15 minutes, or until the cheese is melted and bubbly.
  6. Finish Up: Once done, remove from the oven and drizzle with cheese sauce. Top with sliced jalapeños and chopped cilantro.
  7. Serve: Enjoy your flavorful adobo nachos hot and fresh!

Slow Cooker Adobo

Delicious slow cooker adobo with chicken and spices.

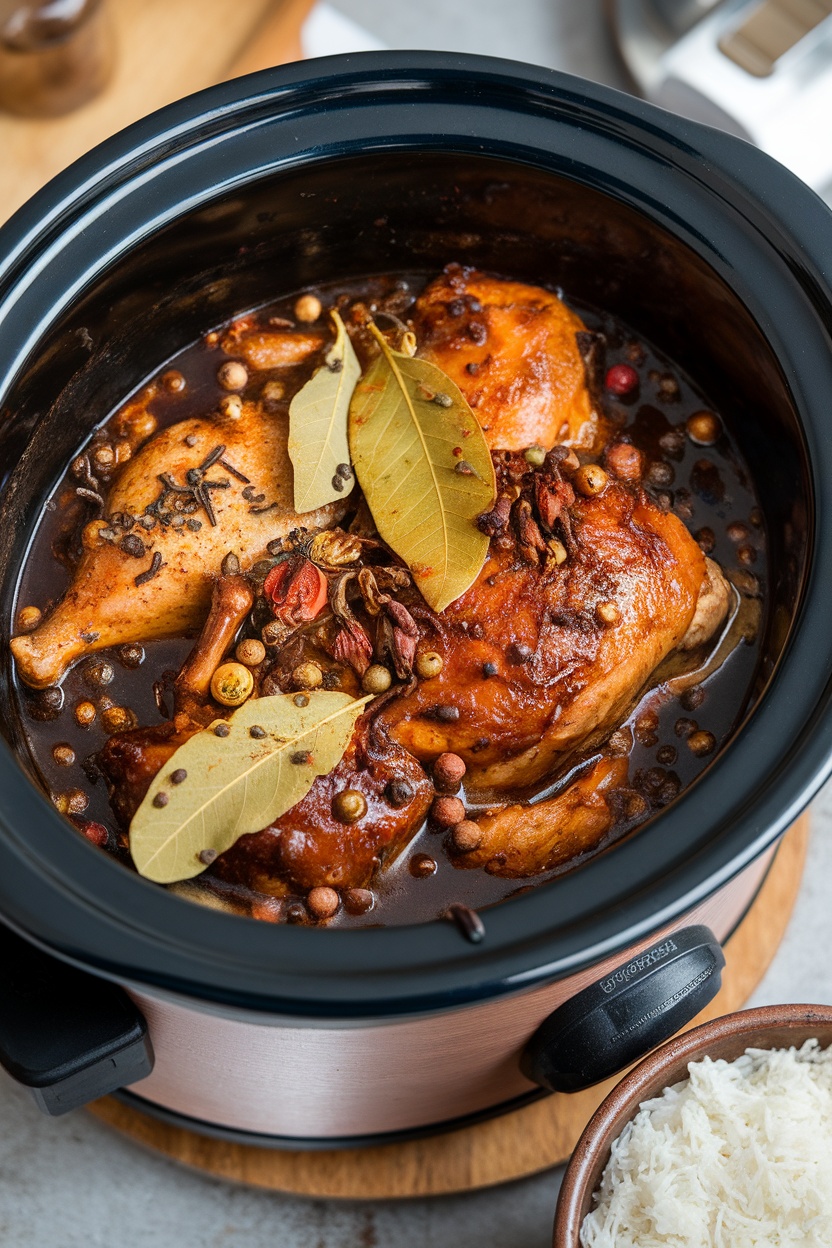
Slow Cooker Adobo is a delightful and easy way to enjoy the rich flavors of this classic Filipino dish. Tender meat is simmered in a savory mix of soy sauce, vinegar, garlic, and spices, creating a dish that’s both tangy and aromatic. The slow cooker makes it simple, allowing all the flavors to meld together beautifully while you go about your day.

This recipe is perfect for busy weeknights or weekend gatherings. Just toss the ingredients in the slow cooker, set it, and let it do the work. The result is a comforting meal that’s sure to please everyone at the table.

Ingredients

  • 2 lbs chicken thighs, skinless
  • 1/2 cup soy sauce
  • 1/4 cup vinegar (preferably cane vinegar)
  • 1 onion, sliced
  • 6 cloves garlic, minced
  • 2 bay leaves
  • 1 teaspoon black peppercorns
  • 1 tablespoon brown sugar
  • 1 cup water
  • Salt and pepper to taste

Instructions

  1. Prepare the Ingredients: In a bowl, combine soy sauce, vinegar, minced garlic, brown sugar, and black peppercorns.
  2. Mix and Marinate: Place the chicken thighs in the slow cooker. Pour the marinade over the chicken, then add the sliced onions and bay leaves on top.
  3. Add Water: Pour in the water to ensure the chicken is submerged. Season with salt and pepper to taste.
  4. Cook: Cover and set the slow cooker on low for 6-8 hours or high for 3-4 hours, until the chicken is tender.
  5. Serve: Once done, remove the bay leaves. Serve the adobo with steamed rice to soak up the delicious sauce.

Grilled Adobo Skewers

Delicious grilled adobo skewers with colorful bell peppers on wooden plate.

Grilled Adobo Skewers bring a fun twist to the classic Filipino dish. Marinated pieces of chicken, infused with the tangy and savory flavors of soy sauce, vinegar, and garlic, are skewered with vibrant bell peppers for a delicious, smoky finish. This dish is perfect for barbecues and gatherings, offering a delightful blend of taste and ease.

Not only are these skewers simple to make, but they’re also a great way to impress your friends and family. The combination of tender chicken and grilled vegetables creates a satisfying meal that packs a flavor punch. Perfect for any occasion, these skewers can be served with rice or enjoyed on their own!

Ingredients

  • 1 lb chicken thighs, cut into bite-sized pieces
  • 1/4 cup soy sauce
  • 1/4 cup vinegar
  • 4 cloves garlic, minced
  • 1 tablespoon brown sugar
  • 1/2 teaspoon black pepper
  • 1 bell pepper (red, green, or yellow), cut into chunks
  • 1 onion, cut into wedges
  • Skewers (soaked in water if wooden)

Instructions

  1. Marinate the Chicken: In a bowl, combine soy sauce, vinegar, minced garlic, brown sugar, and black pepper. Add the chicken pieces and mix well. Cover and marinate in the refrigerator for at least 30 minutes.
  2. Prepare the Skewers: Thread marinated chicken, bell pepper chunks, and onion wedges onto the skewers, alternating between ingredients.
  3. Grill the Skewers: Preheat the grill to medium-high heat. Place the skewers on the grill and cook for about 10-15 minutes, turning occasionally until the chicken is cooked through and has nice grill marks.
  4. Serve: Remove from the grill and let cool slightly before serving. Enjoy your grilled adobo skewers hot with a side of rice or your favorite dipping sauce!

Adobo Lentil Stew

Bowl of Adobo Lentil Stew garnished with fried onions and served with slices of bread.

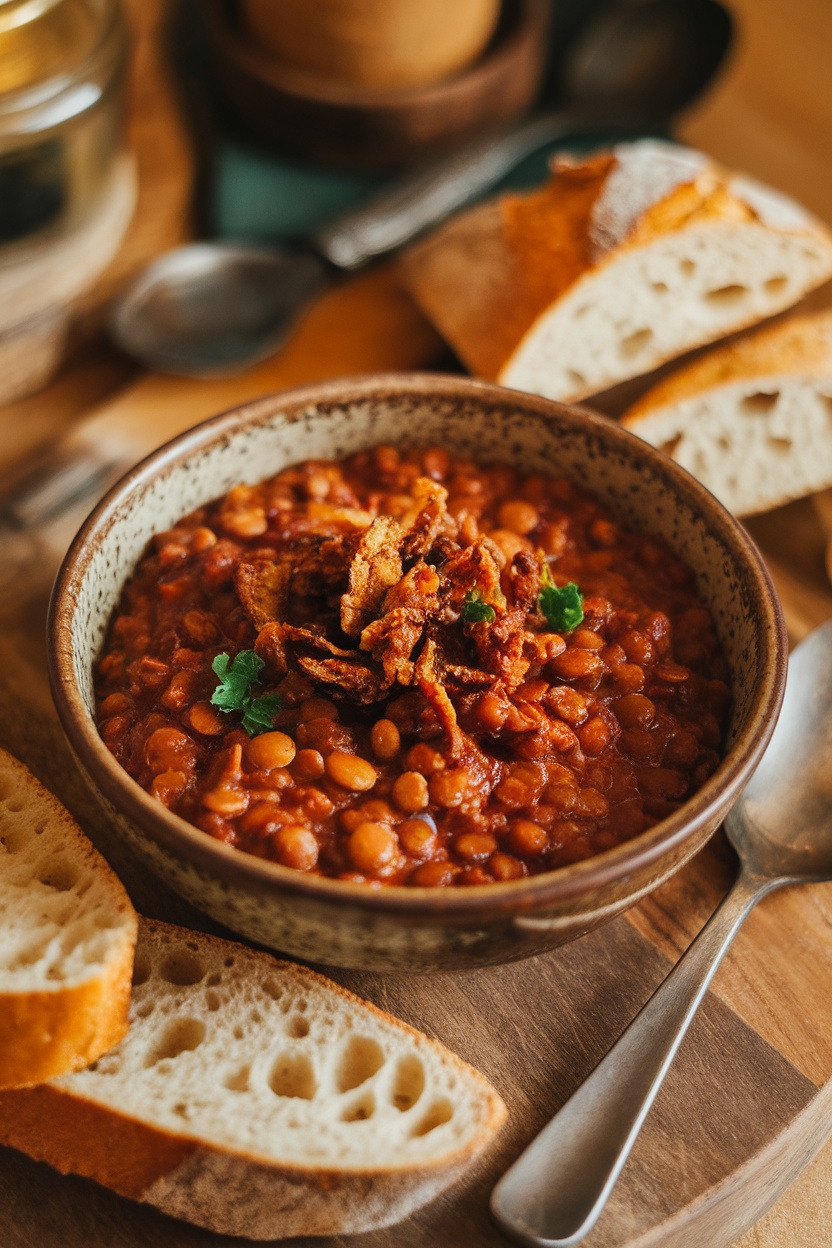
Adobo Lentil Stew is a hearty dish that combines the rich flavors of traditional Filipino adobo with the wholesome goodness of lentils. This stew is both savory and slightly tangy, making it a comforting choice for any meal. Its simple preparation makes it perfect for a weeknight dinner, and it’s packed with nutrition.

The recipe is easy to follow and can be made in under an hour, allowing you to enjoy a delicious homemade meal without the fuss. Serve this stew with crusty bread for a delightful experience that warms both the body and soul.

Ingredients

  • 1 cup lentils, rinsed
  • 1 tablespoon cooking oil
  • 1 onion, chopped
  • 4 cloves garlic, minced
  • 2 medium tomatoes, diced
  • 1/4 cup soy sauce
  • 1/4 cup vinegar
  • 2 cups vegetable broth
  • 1 teaspoon bay leaves
  • 1 teaspoon black pepper
  • 1/2 teaspoon paprika
  • Salt to taste
  • Fried onions for garnish

Instructions

  1. In a large pot, heat the cooking oil over medium heat. Add the chopped onion and garlic, sautéing until fragrant and the onions are translucent.
  2. Add the diced tomatoes and cook until softened.
  3. Stir in the rinsed lentils, soy sauce, vinegar, vegetable broth, bay leaves, black pepper, and paprika. Bring to a boil.
  4. Reduce the heat, cover, and let simmer for about 30 minutes, or until the lentils are tender. Stir occasionally, adding more broth if necessary.
  5. Season with salt to taste before serving. Top with fried onions for an extra crunch and flavor.

Corned Beef Sinigang – A Tangy, Meaty Twist on a Classic!

📌 Prep Time: 15 mins | Cook Time: 45 mins | Servings: 4

🛒 Ingredients

✔️ 500g canned corned beef (chunky style works best)
✔️ 8 cups water
✔️ 1 medium onion, quartered
✔️ 2 medium tomatoes, quartered
✔️ 1 radish (labanos), sliced
✔️ 10 string beans (sitaw), cut into 2-inch pieces
✔️ 1 medium eggplant, sliced
✔️ 1 small taro (gabi), peeled and quartered
✔️ 1 bunch water spinach (kangkong), leaves and tender stems only
✔️ 2-3 pieces green chili (siling haba)
✔️ 2 tbsp fish sauce (patis)
✔️ 1 pack (22g) sinigang mix (tamarind-based) or fresh tamarind extract
✔️ Salt and pepper to taste

🔥 Directions

Step 1: Prepare the Broth

1️⃣ In a large pot, bring 8 cups of water to a boil.
2️⃣ Add onions, tomatoes, and taro. Simmer for 10 minutes until the taro softens.

Step 2: Add the Corned Beef & Vegetables

3️⃣ Stir in the corned beef, breaking it into chunks. Simmer for another 10 minutes.
4️⃣ Add radish, eggplant, and string beans. Let cook for 5 minutes.

Step 3: Season & Add Greens

5️⃣ Pour in the sinigang mix (or tamarind extract) and stir well. Adjust the sourness to taste.
6️⃣ Season with fish sauce, salt, and pepper. Add the green chilies.
7️⃣ Lastly, add the kangkong and turn off the heat. Let the residual heat wilt the leaves.

Step 4: Serve & Enjoy!

🥄 Serve hot with steamed rice and enjoy this hearty, tangy sinigang twist!


🍽️ What to Pair with Corned Beef Sinigang

This rich and tangy dish pairs perfectly with Tortang Talong for a satisfying balance of smoky and sour flavors.


🛒 Best Ingredient Brands to Use

✔️ Corned Beef: Purefoods Chunky Corned Beef or Delimondo Ranch Style for the best texture
✔️ Sinigang Mix: Knorr Sinigang sa Sampalok for a well-balanced sourness
✔️ Fish Sauce: Rufina or Datu Puti for an authentic umami kick


📜 The Story Behind Corned Beef Sinigang

Corned Beef Sinigang is a creative twist on the traditional sinigang, swapping out fresh meat for the convenience and bold flavor of corned beef. This dish is perfect for those who love sinigang but want a quicker, richer version. It’s a fusion of comfort food and Filipino ingenuity, often enjoyed on rainy days or when you’re craving something both hearty and tangy.

Alfredo with Grilled Chicken – Creamy & Flavorful Pasta!

Prep Time: 15 mins | Cook Time: 30 mins | Total Time: 45 mins | Servings: 4

🛒 Ingredients

For the Grilled Chicken:

✔️ 2 boneless, skinless chicken breasts
✔️ 1 tbsp olive oil
✔️ 1 tsp garlic powder
✔️ ½ tsp salt & ½ tsp black pepper
✔️ ½ tsp paprika (for color & smoky flavor)

For the Alfredo Sauce:

✔️ 2 tbsp butter
✔️ 3 cloves garlic, minced
✔️ 1 ½ cups heavy cream
✔️ 1 cup grated Parmesan cheese
✔️ ½ tsp salt & ¼ tsp black pepper
✔️ ¼ tsp nutmeg (optional, for depth of flavor)

For the Pasta:

✔️ 250g fettuccine or spaghetti pasta
✔️ 4 cups water (for boiling)
✔️ 1 tsp salt

For Garnish:

✔️ 2 tbsp chopped parsley
✔️ Extra Parmesan cheese for topping


🔥 Directions

Step 1: Grill the Chicken

1️⃣ Rub chicken breasts with olive oil, garlic powder, salt, black pepper, and paprika.
2️⃣ Heat a grill pan over medium-high heat and cook for 5-7 minutes per side until golden brown and cooked through.
3️⃣ Let rest for 5 minutes, then slice into strips.

Step 2: Cook the Pasta

4️⃣ Boil fettuccine or spaghetti pasta in salted water until al dente (about 10-12 minutes). Drain and set aside.

Step 3: Make the Alfredo Sauce

5️⃣ In a pan over medium heat, melt butter and sauté garlic until fragrant.
6️⃣ Pour in heavy cream and let it simmer for 2 minutes.
7️⃣ Stir in Parmesan cheese, salt, black pepper, and nutmeg. Mix until smooth.

Step 4: Combine Everything

8️⃣ Toss the cooked pasta into the Alfredo sauce, coating evenly.
9️⃣ Plate the pasta, top with sliced grilled chicken, and sprinkle with parsley and extra Parmesan.

Step 5: Serve & Enjoy!

🔹 Serve hot with garlic bread on the side!


🔎 Tips for the Best Alfredo with Grilled Chicken

✔️ Use freshly grated Parmesan for a smooth and creamy sauce.
✔️ Don’t overcook the chicken—keep it juicy by letting it rest before slicing.
✔️ Toss the pasta in the sauce while it’s hot to help it absorb the flavors.
✔️ A pinch of nutmeg enhances the richness of the Alfredo sauce.


🍽️ What to Pair with Alfredo with Grilled Chicken

Enjoy this creamy pasta with Caesar Salad for a refreshing contrast or Garlic Butter Mushrooms for an extra umami boost.


📜 The Story Behind Alfredo with Grilled Chicken

Fettuccine Alfredo is an Italian-inspired comfort dish, but it has become a Filipino favorite for its rich, creamy texture and simple yet indulgent flavors. The addition of grilled chicken brings a smoky depth, making it heartier and more satisfying. In the Philippines, this dish is often served in celebrations and pasta buffets, loved for its balance of savory, cheesy, and garlicky goodness.


🛒 Best Ingredient Brands to Use

✔️ Pasta: Del Monte or Barilla for high-quality, firm fettuccine or spaghetti
✔️ Cheese: Magnolia or Emborg Parmesan for authentic creamy flavor
✔️ Cream: Nestlé All-Purpose Cream for a smooth and rich Alfredo sauce
✔️ Butter: Anchor or Elle & Vire for a creamy, high-quality base
✔️ Olive Oil: Borges or Filippo Berio for the best grilled chicken flavor

Hotdog Cheese Bun Overload – The Ultimate Snack!

Prep Time: 10 mins | Cook Time: 10 mins | Total Time: 20 mins | Servings: 4


🛒 Ingredients

✔️ 4 hotdog buns
✔️ 4 jumbo red hotdogs (Filipino-style)
✔️ 1 cup shredded quick-melt cheese
✔️ 4 lettuce leaves
✔️ ¼ cup mayonnaise
✔️ ¼ cup banana ketchup
✔️ 2 tbsp butter (for toasting)
✔️ 1 tsp sugar (optional, for a sweet-savory touch)


🔥 Directions

Step 1: Cook the Hotdogs

1️⃣ In a pan over medium heat, fry the hotdogs until slightly charred, about 5 minutes. You can also grill them for extra smoky flavor.

Step 2: Toast the Buns

2️⃣ Spread butter inside the hotdog buns and toast them in a pan until golden brown.

Step 3: Assemble the Overload Bun

3️⃣ Spread a layer of mayonnaise and banana ketchup inside each bun.
4️⃣ Place a lettuce leaf inside each bun, followed by the hotdog.
5️⃣ Generously top with shredded cheese. Keeping it shredded adds a rich, creamy bite.

Step 4: Serve & Enjoy!

6️⃣ Serve immediately while the cheese is fresh and the buns are still warm!


🔎 Tips for the Best Hotdog Cheese Bun Overload

✔️ Use jumbo or premium red hotdogs for that signature Filipino taste.
✔️ Toast the buns with butter for extra flavor and crunch.
✔️ Lettuce adds a fresh bite that balances the richness of the cheese and hotdog.
✔️ Go all out with toppings! Try adding crispy fried onions or pickle relish for an extra kick.


🍽️ What to Pair with Hotdog Cheese Bun Overload

This overloaded hotdog bun is perfect with Pritong Kamote Fries for a crunchy side or Sago’t Gulaman for a refreshing drink.


🛒 Best Ingredient Brands to Use

✔️ Hotdog: Tender Juicy or King Sue for the juiciest, most flavorful hotdogs
✔️ Cheese: Eden or Che-Vital for that creamy, slightly salty shredded goodness
✔️ Buns: Gardenia Hotdog Buns for the perfect soft and fluffy texture
✔️ Banana Ketchup: UFC or Papa for that authentic Pinoy sweet-savory taste
✔️ Mayonnaise: Lady’s Choice for the creamiest, best-tasting mayo


📜 The Story Behind Hotdog Cheese Bun Overload

Hotdog sandwiches are a Filipino street food favorite, often sold in food stalls outside schools, parks, and busy streets. The combination of sweet banana ketchup, creamy mayo, and shredded cheese gives it that distinct Pinoy flavor—a mix of sweet, savory, and tangy goodness. Lettuce adds a fresh crunch, balancing the richness of the loaded toppings. This version is inspired by the overloaded hotdogs found in Manila’s night markets and street carts, where more cheese means more happiness!

Sizzling Teriyaki Squid – Sweet, Savory, and Smoky!

📌 Prep Time: 15 mins | Cook Time: 10 mins | Total Time: 25 mins | Servings: 4


🛒 Ingredients:

For the Squid:

✔️ 2 large squid, cleaned and scored
✔️ 1 tbsp calamansi or lemon juice
✔️ ½ tsp salt
✔️ ¼ tsp black pepper
✔️ 1 tbsp cooking oil

For the Teriyaki Sauce:

✔️ 3 tbsp soy sauce
✔️ 2 tbsp mirin (or substitute with honey + vinegar)
✔️ 1 tbsp brown sugar
✔️ 1 tbsp oyster sauce
✔️ 1 tbsp grated ginger
✔️ 2 cloves garlic, minced
✔️ 1 tsp cornstarch dissolved in 2 tbsp water

For Garnish:

✔️ 1 tbsp toasted sesame seeds
✔️ 2 stalks green onions, sliced


🔥 Directions:

Step 1: Prepare the Squid

1️⃣ Clean the squid thoroughly, removing the beak and inner cartilage. Score the body lightly to allow the flavors to absorb.
2️⃣ Marinate with calamansi juice, salt, and pepper for 10 minutes.

Step 2: Make the Teriyaki Sauce

3️⃣ In a saucepan, combine soy sauce, mirin, brown sugar, oyster sauce, ginger, and garlic over low heat.
4️⃣ Simmer for 3–4 minutes until slightly thickened.
5️⃣ Stir in the cornstarch slurry and cook until the sauce becomes glossy. Set aside.

Step 3: Grill or Sear the Squid

6️⃣ Heat cooking oil in a grill pan or skillet over medium-high heat.
7️⃣ Sear the squid for 1–2 minutes per side until lightly charred and tender. (Do not overcook to avoid toughness.)

Step 4: Sizzle & Serve

8️⃣ Heat a sizzling plate and brush lightly with oil.
9️⃣ Place the grilled squid on the hot plate and drizzle with the teriyaki sauce.
🔟 Garnish with sesame seeds and green onions.

🔥 Serve immediately while sizzling hot!


🔎 Tips for Perfect Sizzling Teriyaki Squid

✔️ Don’t overcook the squid—it only needs 1-2 minutes per side to stay tender.
✔️ For deeper flavor, let the squid marinate for 30 minutes before cooking.
✔️ Want more caramelization? Brush some extra teriyaki sauce while grilling.
✔️ Use a sizzling plate for that restaurant-style presentation!


🍽️ What to Pair with Sizzling Teriyaki Squid

This dish pairs well with Chop Suey—the fresh, crunchy vegetables complement the sweet and savory teriyaki sauce perfectly.


🛒 Best Ingredient Brands to Use

✔️ Soy Sauce: Kikkoman or Silver Swan for authentic umami.
✔️ Oyster Sauce: Lee Kum Kee for a rich, savory depth.
✔️ Mirin Substitute: Use honey + apple cider vinegar for a close match.


📜 The Story Behind Sizzling Teriyaki Squid

Sizzling Teriyaki Squid combines Japanese teriyaki flavors with the Filipino sizzling plate experience. This dish is a street food favorite in the Philippines, often served in seaside restaurants and dampa-style eateries. The balance of sweet, salty, and smoky flavors makes it an irresistible seafood dish for any occasion.

Chop Suey – Colorful, Nutritious, and Delicious!

📌 Prep Time: 15 mins | Cook Time: 20 mins | Total Time: 35 mins | Servings: 4

🛒 Ingredients:

Vegetables:

✔️ 1 cup cauliflower, cut into florets
✔️ 1 cup broccoli, cut into florets
✔️ 1 medium carrot, sliced diagonally
✔️ 1 red bell pepper, sliced into strips
✔️ 1 green bell pepper, sliced into strips
✔️ 1 cup young corn, sliced
✔️ 1 cup snow peas (chicharo)
✔️ 1 cup cabbage, roughly chopped

Protein (Choose One or Combine):

✔️ 200g chicken breast, sliced thinly
✔️ 200g pork, sliced thinly
✔️ 200g shrimp, peeled and deveined
✔️ 100g liver, sliced thinly (optional)

Sauce & Seasoning:

✔️ 3 cloves garlic, minced
✔️ 1 small onion, sliced
✔️ 1 ½ tbsp soy sauce
✔️ 1 tbsp oyster sauce
✔️ 1 ½ cups chicken broth or water
✔️ 1 tbsp cornstarch dissolved in 3 tbsp water (for thickening)
✔️ ½ tsp salt
✔️ ½ tsp ground black pepper
✔️ 1 tbsp cooking oil


🔥 Directions:

Step 1: Sauté the Aromatics

1️⃣ Heat oil in a wok or large pan over medium heat.
2️⃣ Sauté garlic and onion until fragrant.

Step 2: Cook the Protein

3️⃣ Add the chicken, pork, or liver and cook until lightly browned.
4️⃣ If using shrimp, add it last and cook until pink (about 2 minutes).

Step 3: Add Vegetables & Sauce

5️⃣ Pour in chicken broth, soy sauce, and oyster sauce. Stir well.
6️⃣ Add carrots, young corn, and cauliflower. Cover and cook for 3 minutes.
7️⃣ Add broccoli, bell peppers, and snow peas. Cook for another 3 minutes.
8️⃣ Stir in cabbage and let it cook for 1 minute.

Step 4: Thicken & Serve

9️⃣ Pour in the cornstarch slurry and mix until the sauce thickens.
🔟 Season with salt & pepper to taste.

🔥 Serve hot with steamed rice!


🔎 Tips for the Best Chop Suey

✔️ Use high heat when stir-frying to keep the vegetables crisp and vibrant.
✔️ Add the vegetables in stages, starting with the firmest ones to ensure even cooking.
✔️ Don’t overcook the cabbage—it should still have a slight crunch.
✔️ For extra umami, add a few drops of sesame oil before serving.


🍽️ What to Pair with Chop Suey

Chop Suey pairs well with Pritong Galunggong—the crispiness of the fried fish contrasts beautifully with the saucy vegetables.


🛒 Best Ingredient Brands to Use

✔️ Oyster Sauce: Try Lee Kum Kee for an authentic, rich umami flavor.
✔️ Soy Sauce: Silver Swan or Marca Piña for the perfect balance of saltiness.
✔️ Cornstarch: Argo or Kingsford for smooth thickening.


📜 The Story Behind Chop Suey

Chop Suey is a stir-fried vegetable dish with Chinese origins that became a Filipino household favorite. With its colorful mix of vegetables and choice of protein, it’s a healthy, budget-friendly meal perfect for busy days. Whether enjoyed with steamed rice or as a side dish, its savory, umami-packed sauce makes every bite satisfying.

Ginataang Monggo – Creamy & Nutritious Filipino Comfort Food

📌 Prep Time: 10 mins | Cook Time: 40 mins | Total Time: 50 mins | Servings: 4


🛒 Ingredients

✔️ 1 cup mung beans (monggo)
✔️ 4 cups water
✔️ 1 tbsp cooking oil
✔️ 3 cloves garlic (minced)
✔️ 1 small onion (chopped)
✔️ 1 medium tomato (diced)
✔️ 1 ½ cups coconut milk (gata)
✔️ 1 cup malunggay leaves (or spinach as an alternative)
✔️ ½ tsp salt (adjust to taste)
✔️ ¼ tsp black pepper
✔️ 1 tbsp fish sauce (optional, for extra umami)


🔥 Directions

Step 1: Toast & Cook the Monggo

1️⃣ Rinse mung beans thoroughly under running water.
2️⃣ In a dry pan over medium heat, toast the mung beans for 3-5 minutes until fragrant and lightly browned.
3️⃣ Transfer to a pot, add water, and bring to a boil. Simmer for 30 minutes or until the beans are soft. Mash lightly with a spoon for a thicker consistency.

Step 2: Sauté the Aromatics

4️⃣ In another pan, heat cooking oil over medium heat.
5️⃣ Sauté garlic until golden brown, then add onions and tomatoes. Cook until softened and fragrant.

Step 3: Combine & Simmer

6️⃣ Pour the sautéed mixture into the pot with the softened mung beans. Stir well.
7️⃣ Add coconut milk and simmer for another 5 minutes.
8️⃣ Season with salt, black pepper, and fish sauce (if using). Stir to combine.

Step 4: Add Greens & Serve

9️⃣ Stir in malunggay leaves and let it cook for another 2 minutes.
🔟 Turn off the heat and let it rest for a few minutes before serving.

🔥 Serve hot with steamed rice and enjoy this comforting, nutritious dish!


🔎 Tips for the Best Ginataang Monggo

✔️ Toast the mung beans – This enhances their nutty flavor.
✔️ Adjust consistency – Mash some of the beans for a creamier texture or leave them whole for a soupier consistency.
✔️ Use fresh coconut milk – If available, fresh gata provides the richest flavor.
✔️ Make it heartier – Add sliced shrimp, fried dried fish, or pork bits for extra protein.


🍽️ What to Pair with Ginataang Monggo

Ginataang Monggo pairs well with Tortang Talong! The smoky, egg-battered eggplant balances the creamy texture of the monggo dish. Want to try it? Check out the Tortang Talong recipe!


🛒 Best Ingredient Brands to Use

✔️ Coconut Milk: Use high-quality canned coconut milk or fresh gata for the best flavor.
✔️ Mung Beans: Choose clean, unpolished mung beans for better texture and taste.
✔️ Fish Sauce: A splash of premium fish sauce enhances the umami flavor.


📜 The Story Behind Ginataang Monggo

Ginataang Monggo is a comforting Filipino dish that blends the nutty taste of mung beans with the rich, creamy texture of coconut milk. It is a staple in many households, often enjoyed during rainy days or as a nutritious everyday meal. Some versions add shrimp, dried fish, or even pork for extra depth of flavor.

Tortang Talong (Filipino Eggplant Omelet) Recipe

📌 Prep Time: 10 mins | Cook Time: 20 mins | Total Time: 30 mins | Servings: 2

Ingredients

  • 2 large eggplants (talong) – Choose firm, deep purple ones for best results.
  • 2 large eggs – Preferably free-range for a richer taste.
  • ½ tsp salt – Adjust to taste.
  • ¼ tsp black pepper – Freshly ground for better aroma.
  • ½ tsp garlic powder (optional) – Adds depth of flavor.
  • ¼ cup cooking oil – Golden Fiesta or Baguio Oil work well for frying.

Directions

Step 1: Grill the Eggplants

  • Using an open flame or stovetop burner, roast the eggplants until the skin is charred and soft, turning occasionally for even cooking.
  • Once done, let them cool slightly, then peel off the blackened skin while keeping the stem intact.
  • Flatten each eggplant with a fork, spreading it out into an oval shape.

Step 2: Prepare the Egg Mixture

  • In a bowl, beat the eggs with salt, black pepper, and garlic powder (if using).
  • Dip the flattened eggplants into the beaten eggs, ensuring they are well-coated.

Step 3: Fry the Tortang Talong

  • Heat oil in a pan over medium heat.
  • Carefully place one coated eggplant in the pan, pouring a little extra beaten egg on top.
  • Fry for 2-3 minutes per side or until golden brown and crispy on the edges.
  • Repeat for the second eggplant.

Step 4: Serve and Enjoy!

  • Drain excess oil on paper towels. Serve hot with banana ketchup or spicy vinegar.

What to Pair with Tortang Talong

For a complete meal, pair Tortang Talong with Ginataang Monggo (mung bean stew with coconut milk). The creamy, slightly nutty flavors of the monggo dish perfectly balance the smoky, crispy texture of the eggplant omelet.

Best Ingredient Brands to Use

✔️ Eggs: Use fresh, high-quality eggs for a richer taste.
✔️ Cooking Oil: Choose a neutral oil for frying like Golden Fiesta or Baguio Oil.
✔️ Salt & Pepper: Freshly ground black pepper enhances the flavor.
✔️ Banana Ketchup: Use Jufran or UFC for an authentic Filipino touch.

The History of Tortang Talong

Tortang Talong is a staple in Filipino households, often served as a budget-friendly yet delicious meal. The dish’s origins are rooted in traditional Filipino cooking, where eggplant is commonly used due to its availability and versatility. It’s believed to have evolved from Spanish-influenced omelets but has retained a unique Pinoy twist with its smoky eggplant base.

Chicharon Bulaklak – Crispy & Savory Filipino Delight

Prep Time: 15 mins | Cook Time: 40 mins | Total Time: 55 mins | Servings: 4


🛒 Ingredients

✔️ 1 kg pork mesentery (bulaklak)
✔️ 1 tbsp salt
✔️ 1 tbsp whole black peppercorns
✔️ 5 cloves garlic (crushed)
✔️ 4 cups water
✔️ 1 tbsp vinegar
✔️ Cooking oil (for deep frying)

For Dipping Sauce:
✔️ Spiced vinegar (sukang Iloko or cane vinegar)
✔️ Chopped red chilies (optional)
✔️ 1 tsp soy sauce (optional for extra umami)


🔥 Directions

Step 1: Clean the Bulaklak

1️⃣ Wash the pork mesentery thoroughly under running water.
2️⃣ Trim excess fat and remove any impurities.
3️⃣ Rub with salt and vinegar, then rinse well.

Step 2: Boil Until Tender

4️⃣ In a pot, add the pork bulaklak, water, garlic, salt, and peppercorns. Bring to a boil.
5️⃣ Simmer for 30–40 minutes or until tender.
6️⃣ Drain and let it cool completely. (For extra crispiness, chill in the fridge for 1 hour.)

Step 3: Fry Until Crispy

7️⃣ Heat enough oil in a deep pan over medium-high heat.
8️⃣ Fry the boiled bulaklak in batches until golden brown and crispy (about 3–5 minutes per batch).
9️⃣ Drain excess oil on paper towels.

Step 4: Serve & Enjoy!

🔥 Serve hot with spiced vinegar dipping sauce!


🔎 Tips for Extra Crunchy Chicharon Bulaklak

✔️ Double-fry method: Fry once at low heat to render fat, then fry again at high heat for ultimate crispiness.
✔️ Air-dry for 1 hour before frying to prevent oil splatter.
✔️ Use a wire strainer when frying to keep the pieces crispy and evenly cooked.
✔️ For less grease, place on a cooling rack after frying instead of paper towels.


🍽️ What to Pair with Chicharon Bulaklak

Chicharon Bulaklak pairs perfectly with an ice-cold beer or a refreshing soda. For an ulam pairing, try it with Laing (Spicy Taro Leaves in Coconut Milk)!


🛒 Best Ingredient Brands to Use

✔️ Vinegar: Sukang Iloko or Datu Puti for the best dipping sauce
✔️ Pork: Get fresh mesentery from a reputable butcher for best quality
✔️ Soy Sauce: Marca Piña or Silver Swan for added umami in the sauce


📜 The Story Behind Chicharon Bulaklak

Chicharon Bulaklak is a popular Filipino pulutan (beer snack) known for its crispy, savory, and addictive flavor. The name “bulaklak” (flower) comes from its frilly, curled-up shape after frying. Despite being high in cholesterol, it remains a beloved guilty pleasure, often served in Filipino gatherings and street food stalls. Traditionally enjoyed with sukang Iloko, its crunchy texture and tangy dip make it a must-try snack!

A steaming bowl of Beef Sinigang with tender meat and vegetables in a rich tamarind broth. Alt Text: A traditional bowl of Sinigang na Baka with beef shank, vegetables, and sour tamarind broth.

Sinigang na Baka (Beef Sinigang) – A Tangy and Comforting Filipino Soup

Prep Time: 15 mins | Cook Time: 1 hr 30 mins | Total Time: 1 hr 45 mins | Servings: 6


🛒 Ingredients

✔️ 1.5 kg beef shank (or short ribs, cut into serving pieces)
✔️ 2 large tomatoes (quartered)
✔️ 1 medium onion (quartered)
✔️ 8 cups water
✔️ 2-3 tbsp fish sauce (to taste)
✔️ 1 large radish (sliced into rounds)
✔️ 1 bunch of string beans (cut into 2-inch pieces)
✔️ 1 large eggplant (sliced into rounds)
✔️ 1 bunch kangkong (water spinach, trimmed)
✔️ 3 pieces green chili (siling haba, optional)
✔️ 1 pack sinigang mix (Knorr or Mama Sita’s Tamarind Soup Mix) OR
✔️ 1 1/2 cups fresh tamarind pulp (boiled, strained, and mashed for natural sourness)


🔥 Directions

Step 1: Boil the Beef

1️⃣ Combine beef shank, tomatoes, onions, and water in a large pot. Bring to a boil over high heat.
2️⃣ Lower to a simmer and cook for 1.5 to 2 hours (or 40 minutes in a pressure cooker) until the beef is fork-tender. Skim off any scum that rises to the top.

Step 2: Flavor the Broth

3️⃣ Add fish sauce and stir. Taste and adjust as needed.
4️⃣ Pour in the sinigang mix (or fresh tamarind pulp). Stir well and simmer for another 10 minutes.

Step 3: Add the Vegetables

5️⃣ Toss in radish, eggplant, and string beans. Simmer for 5 minutes until slightly tender.
6️⃣ Add green chili for extra heat (optional).
7️⃣ Lastly, add kangkong and let it cook for 1-2 minutes.

Step 4: Serve & Enjoy!

🔥 Serve hot with steaming rice and enjoy the comforting tangy broth!


🔎 Tips for the Best Sinigang na Baka

✔️ For richer broth: Use beef bones for a deep, flavorful stock.
✔️ Want a healthier option? Add more veggies like okra or sitaw.
✔️ No tamarind? You can substitute with calamansi or green mango for natural sourness.
✔️ Faster cooking? A pressure cooker will tenderize the beef in just 40 minutes!


A steaming bowl of Beef Sinigang with tender meat and vegetables in a rich tamarind broth.
Alt Text: A traditional bowl of Sinigang na Baka with beef shank, vegetables, and sour tamarind broth.

🍽️ What to Pair with Sinigang na Baka

For the ultimate Filipino meal, pair Sinigang na Baka with Tortang Talong (eggplant omelet). The smoky eggplant and fluffy eggs balance the sourness of the broth. Looking for a perfect side dish? Try Tortang Talong today!

Another great option is Chicharon Bulaklak, adding a crispy, savory bite to contrast the soup’s rich, tangy flavors. Craving crunch with your Sinigang? Check out Chicharon Bulaklak!


🛒 Best Ingredient Brands to Use

✔️ Sinigang Mix: Knorr or Mama Sita’s for a quick and authentic tamarind flavor
✔️ Beef: Go for well-marbled beef shank or short ribs for the best taste
✔️ Fish Sauce: Use Barrio Fiesta or Rufina for a deep umami flavor
✔️ Vegetables: Fresh kangkong and radish give the best texture and taste


📜 The History of Sinigang

Sinigang is one of the most beloved comfort foods in the Philippines, known for its tangy and savory broth. The dish dates back to pre-colonial times when early Filipinos used tamarind, guava, or green mango to sour their stews. While pork sinigang is the most popular, beef sinigang is a richer, heartier version loved for its deep flavors. Today, Sinigang remains a staple in Filipino homes, perfect for cold and rainy days!

Authentic Tinolang Manok Recipe

Looking for a comforting and wholesome soup? Tinolang Manok is a traditional Filipino chicken soup that’s perfect for any day. This recipe brings warmth and nourishment to your table, capturing the essence of home cooking that everyone loves. It’s simple to prepare and showcases the delightful flavors of ginger and fresh herbs.

Imagine tender chicken simmered in a savory broth, combined with fresh vegetables like green papaya and leafy spinach. Each spoonful offers a comforting warmth, making it a perfect choice for family gatherings or a cozy dinner.

Traditional Filipino Chicken Soup

Tinolang Manok embodies the essence of Filipino comfort food. This soup features tender chicken, simmered until perfectly cooked, resulting in a rich yet light broth that is both nourishing and satisfying.

The combination of ginger and fresh vegetables lends a fragrant quality to the dish, making it an ideal choice for family gatherings or quiet dinners at home. The vibrant color of the green papaya and spinach not only adds visual appeal but also enhances the overall flavor profile.

Ingredients that Shine

The simplicity of Tinolang Manok is one of its greatest strengths. A whole chicken cut into pieces serves as the main ingredient, while fresh ginger, onions, and green papaya provide a depth of flavor that is hard to match.

Spinach or other leafy greens contribute a nutritional boost, turning each bowl into a wholesome meal. A touch of fish sauce enriches the broth, balancing the flavors beautifully. Garnishing with chopped green onions adds a fresh and aromatic finish, elevating the dish further.

Aromatic Preparations

The preparation of Tinolang Manok begins with sautéing onions and ginger in heated oil. This step is vital, as it releases the aromatic oils that form the foundation of the broth.

Once fragrant, adding the chicken pieces allows them to absorb the flavors of the aromatics. After cooking until no longer pink, a splash of fish sauce brings an umami punch that makes the soup irresistible.

Cooking Process

The cooking process is straightforward, making it accessible for home cooks of all skill levels. After sautéing the ingredients, water is added and brought to a boil. The simmering stage is essential, allowing the chicken to become tender and the flavors to meld.

After about 20 minutes of simmering, the sliced green papaya is introduced. This not only adds sweetness but also a satisfying texture. The soup continues to simmer until the papaya reaches the perfect tenderness, followed by the addition of spinach, which wilts beautifully in the hot broth.

Serving Suggestions

Once cooked, Tinolang Manok is ready to be served. Ladling the soup into bowls reveals the delightful combination of chicken, papaya, and greens, each bite offering warmth and comfort.

A rustic wooden spoon beside the bowl adds to the cozy presentation. For those who enjoy a bit of extra flavor, a sprinkle of chopped green onions on top provides a fresh touch that complements the dish perfectly.

The Heart of Home Cooking

Tinolang Manok is more than just a meal; it represents the heart of home cooking in Filipino culture. Its soothing flavors and nurturing ingredients make it a go-to option for rainy days or when someone needs a little extra warmth.

This traditional dish not only nourishes the body but also brings families together, creating lasting memories around the dinner table. Whether enjoyed on a special occasion or a regular weeknight, Tinolang Manok is sure to bring comfort and joy to any meal.

Traditional Filipino Chicken Soup

A bowl of Tinolang Manok with chicken, papaya, and spinach in ginger broth, garnished with green onions.

Tinolang Manok is a light and fragrant soup made with chicken, ginger, and fresh vegetables. This dish is characterized by its warm and soothing flavors, making it a family favorite during rainy days or for a hearty meal.

Ingredients

  • 1 whole chicken cut into serving pieces
  • 1 medium onion chopped
  • 2 tablespoons ginger sliced
  • 4 cups water
  • 1 medium green papaya peeled and sliced
  • 2 cups spinach or other leafy greens
  • 2 tablespoons fish sauce
  • Salt and pepper to taste
  • 2 tablespoons cooking oil
  • Chopped green onions for garnish (optional)

Instructions

  1. Sauté Aromatics: In a large pot, heat oil over medium heat. Add chopped onion and ginger, sauté until fragrant.
  2. Cook Chicken: Add the chicken pieces and cook until no longer pink. Stir in fish sauce and cook for a few more minutes.
  3. Add Water: Pour in the water and bring to a boil. Reduce heat and simmer for about 20 minutes.
  4. Incorporate Vegetables: Add the sliced green papaya and simmer until tender, about 10 minutes.
  5. Finish with Greens: Stir in the spinach and cook until wilted. Season with salt and pepper to taste.
  6. Serve: Ladle soup into bowls, garnish with chopped green onions if desired, and enjoy hot.

Cook and Prep Times

  • Prep Time: 10 minutes
  • Cook Time: 40 minutes
  • Total Time: 50 minutes

Nutrition Information

  • Servings: 6 servings
  • Calories: 180kcal
  • Fat: 7g
  • Protein: 30g
  • Carbohydrates: 8g

Crispy Fried Hotdogs with Instant Noodles Recipe

Looking for a quick and satisfying meal that brings a smile to your face? This crispy fried hotdogs paired with instant noodles is just the ticket. It’s a simple dish that combines the nostalgia of childhood favorites with a touch of creativity. You’ll love how easy it is to whip up, and the flavors will take you back to carefree days.

This recipe transforms basic hotdogs into crispy bites that are perfect for snacking or a light meal. The instant noodles add a delightful twist, making this dish comforting and full of flavor. Whether you’re in a hurry or just craving something delicious, this recipe is your go-to solution.

Delightful Hotdogs: A Crispy Treat

The transformation of hotdogs into crispy bites is a culinary delight that elevates a classic.

The golden-brown exterior is not only visually appealing but also ensures a satisfying crunch with each bite.

Herbs sprinkled on top enhance the flavor profile, making them even more irresistible.

Instant Noodles: Quick Comfort Food

Instant noodles serve as the perfect companion to crispy hotdogs.

Their soft and chewy texture complements the crunchiness of the hotdogs, providing a delightful contrast.

When tossed with soy sauce, the noodles take on a savory flavor that ties the dish together, offering a comforting element for a quick meal.

Preparing Your Ingredients

To create this dish, start with the right ingredients.

Using fresh hotdogs and quality instant noodles is key to achieving a delicious outcome.

Gathering a few pantry staples like flour, spices, and breadcrumbs will also aid in the preparation process, allowing you to whip up this dish in no time.

Cooking Techniques for Crunchiness

Frying the hotdogs is an important step that yields that coveted crispy texture.

Dredging them in flour and breadcrumbs before frying helps create a golden crust that locks in flavor.

The ideal frying temperature is crucial; too low, and they’ll absorb oil, too high, and they might burn. Finding that sweet spot is essential for perfecting your hotdogs.

Serving Suggestions

When it comes to serving, presentation plays a role in enhancing the eating experience.

Plating the crispy fried hotdogs next to a mound of glistening noodles creates an appealing contrast that invites you to dig in.

To elevate the dish further, consider adding a side of dipping sauce or fresh herbs for garnish, which can add a pop of color and flavor.

Enjoying the Meal

This dish is not just about taste; it’s about reliving memories of childhood favorites.

Whether you’re enjoying it alone or sharing with friends, it is a meal that brings joy and satisfaction.

Dig into this comforting plate and relish the delightful combination of flavors and textures that make every bite enjoyable.

Quick and Easy Fried Hotdogs with Instant Noodles

Crispy fried hotdogs and instant noodles on a plate, ready to be served.

The crispy fried hotdogs are golden and crunchy on the outside, bursting with juicy flavor on the inside. Paired with instant noodles, this dish offers a lovely textural contrast, making each bite satisfying.

Ingredients

  • 4 hotdogs
  • 1 cup all-purpose flour
  • 1 teaspoon paprika
  • 1/2 teaspoon garlic powder
  • 1/2 teaspoon salt
  • 1/4 teaspoon black pepper
  • 1/2 cup breadcrumbs
  • Oil for frying
  • 2 packs of instant noodles
  • 2 cups water
  • Soy sauce or seasoning from instant noodle packs to taste

Instructions

  1. Prepare the Hotdogs: Cut the hotdogs into halves or quarters, depending on your preference.
  2. Coat the Hotdogs: In a bowl, mix flour, paprika, garlic powder, salt, and black pepper. Dredge the hotdogs in the flour mixture, ensuring they’re fully coated, then dip them in breadcrumbs.
  3. Heat the Oil: In a deep skillet, heat oil over medium heat. Once hot, carefully add the coated hotdogs and fry until golden brown and crispy, about 3-4 minutes. Drain on paper towels.
  4. Cook the Instant Noodles: In a pot, bring water to a boil. Add the instant noodles and cook according to package instructions, usually about 3-4 minutes. Drain and toss with soy sauce or seasoning.
  5. Serve: Plate the crispy fried hotdogs next to the instant noodles. Enjoy while hot!

Cook and Prep Times

  • Prep Time: 10 minutes
  • Cook Time: 15 minutes
  • Total Time: 25 minutes

Nutrition Information

  • Servings: 2 servings
  • Calories: 450kcal
  • Fat: 22g
  • Protein: 15g
  • Carbohydrates: 51g

Authentic Chicken Inasal Recipe

Chicken Inasal is a beloved Filipino grilled chicken dish that bursts with flavor. It’s marinated in a mixture of vinegar, calamansi, and spices, resulting in tender, juicy meat with a delightful tang. Perfect for gatherings or a simple family dinner, this dish embodies the essence of Filipino cuisine.

Imagine the aroma of marinated chicken sizzling over hot coals, each bite revealing layers of flavor. The tangy marinade, combined with a hint of smokiness from grilling, creates a dish that’s both satisfying and memorable. Pair it with steamed rice and a side of atsara for a complete meal.

This recipe is not just a meal; it’s a celebration of flavors that showcases the Filipino love for grilling and bold tastes. With simple ingredients and straightforward steps, you can bring a taste of the Philippines right to your kitchen.

The Allure of Chicken Inasal

Chicken Inasal captivates the senses with its rich marinade and the intoxicating aroma of grilled meat. This dish, hailing from the Philippines, is characterized by its vibrant flavors, combining the tanginess of calamansi and the warmth of spices. Each bite transports you to a rustic Filipino table, where the warmth of tradition meets culinary creativity.

The grilling process not only enhances the flavor but also creates an inviting char that adds depth to the chicken. The hints of smokiness from the grill beautifully complement the tangy marinade, resulting in a dish that is both savory and slightly sweet. Paired with steamed rice, Chicken Inasal becomes a fulfilling meal that delights the palate.

Marinade Magic

The heart of Chicken Inasal lies in its marinade. A blend of vinegar, soy sauce, garlic, ginger, and calamansi juice transforms simple chicken into a culinary masterpiece. The marinade infuses the meat with flavor, ensuring that every bite is bursting with taste.

Allowing the chicken to soak in this vibrant mixture not only tenderizes the meat but also enhances its juiciness. For the best results, marinating overnight is recommended, allowing the flavors to deepen and meld together. This step is where the magic happens, turning basic ingredients into something extraordinary.

The Perfect Grilling Technique

Achieving the ideal char is essential for Chicken Inasal. Preheating the grill to medium-high heat ensures that the chicken cooks evenly while developing those coveted grill marks. Basting the chicken with reserved marinade during grilling contributes to a moister texture and enriches the flavor.

Grilling for 6-8 minutes per side creates a beautiful outer layer while keeping the inside succulent and juicy. The careful attention to timing and temperature makes all the difference, transforming each piece into a grilled delight.

Serving Suggestions

Presentation plays a key role in enjoying Chicken Inasal. A vibrant plate garnished with calamansi slices invites diners to interact with their meal. The zesty fruit not only adds a pop of color but also a refreshing brightness when squeezed over the chicken.

Accompanying the dish with a mound of steamed rice and a small bowl of atsara, a pickled vegetable side, creates a balanced plate. The sweetness and tanginess of atsara cut through the savory richness of the chicken, enhancing the overall dining experience.

The Cultural Connection

Chicken Inasal is more than just a meal; it embodies Filipino culture and hospitality. Often enjoyed during gatherings or special occasions, this dish invites family and friends to come together over something delicious. The vibrant colors and communal style of eating foster a sense of togetherness that resonates deeply within the Filipino spirit.

Every bite of Chicken Inasal tells a story of tradition, love, and celebration. It’s a dish that reflects the warmth of home-cooked meals and the joy of sharing delicious food with loved ones.

Conclusion to the Experience

With its rich marinade, expert grilling, and cultural significance, Chicken Inasal stands out as a beloved Filipino dish. Whether you’re enjoying it at a festive gathering or a simple family dinner, the flavors and aromas create an unforgettable experience that lingers long after the last bite. This culinary gem invites everyone to savor the essence of Filipino cuisine.

The Best Chicken Inasal Recipe

Grilled Chicken Inasal served with rice and atsara, garnished with calamansi on a rustic table.

Chicken Inasal is marinated in a vibrant blend of vinegar, garlic, ginger, and spices, then grilled to perfection. It’s savory and slightly sweet with a smoky flavor, making it a perfect dish for any occasion.

Ingredients

  • 2 pounds chicken (thighs, drumsticks, or whole cut-up chicken)
  • 1/2 cup vinegar (preferably cane vinegar)
  • 1/4 cup soy sauce
  • 1 tablespoon calamansi juice (or lemon juice)
  • 1 head garlic, minced
  • 1 inch ginger, grated
  • 1 teaspoon black pepper
  • 1 tablespoon brown sugar
  • 1 teaspoon salt, adjust to taste
  • Bamboo skewers (optional, for grilling)
  • Banana leaves (optional, for wrapping)

Instructions

  1. Prepare the Marinade: In a bowl, combine vinegar, soy sauce, calamansi juice, minced garlic, grated ginger, black pepper, brown sugar, and salt. Mix well.
  2. Marinate the Chicken: Place the chicken pieces in a large ziplock bag or bowl and pour the marinade over them. Seal or cover, then refrigerate for at least 1 hour, or overnight for best flavor.
  3. Preheat the Grill: Preheat your grill to medium-high heat. If you’re using bamboo skewers, soak them in water for about 30 minutes to prevent burning.
  4. Grill the Chicken: Remove the chicken from the marinade (reserve some marinade for basting). Grill the chicken for about 6-8 minutes on each side, basting occasionally with the reserved marinade, until fully cooked and charred to your liking.
  5. Serve: Once cooked, remove the chicken from the grill and let it rest for a few minutes. Serve hot with steamed rice and a side of atsara.

Cook and Prep Times

  • Prep Time: 15 minutes
  • Marinate Time: 1 hour
  • Cook Time: 20 minutes
  • Total Time: 1 hour 35 minutes

Nutrition Information

  • Servings: 4 servings
  • Calories: 320kcal
  • Fat: 14g
  • Protein: 30g
  • Carbohydrates: 6g

Flavorful Pinakbet Recipe with Vegetables

Pinakbet is a delightful Filipino dish that showcases a medley of fresh vegetables, perfectly simmered to create a hearty and nutritious meal. This dish is not just food; it’s an experience that celebrates the rich flavors of the Philippines, making it a favorite among locals and visitors alike.

Imagine a vibrant plate filled with vegetables like eggplant, bitter melon, and squash, all soaked in a savory shrimp paste sauce. Each bite bursts with flavor, bringing together a balance of sweetness, bitterness, and umami that is simply irresistible.

Perfect for a family dinner or a special occasion, this Pinakbet recipe allows you to embrace the wholesome goodness of vegetables while satisfying your taste buds.

Colors of the Dish

Pinakbet is a feast for the eyes, showcasing a vibrant array of vegetables that are both colorful and nutritious. A combination of squash, eggplant, and bitter melon creates a striking visual presentation that highlights the beauty of Filipino cuisine.

The rich hues of each vegetable not only make the dish appealing but also signify the flavors that await. Each ingredient brings its own unique taste, contributing to a delightful blend that is both satisfying and wholesome.

Savory Shrimp Paste

One of the standout features of pinakbet is the inclusion of shrimp paste, known locally as bagoong. This ingredient adds an umami depth that elevates the dish to new heights.

The savory, salty notes of the shrimp paste intertwine beautifully with the natural sweetness of the vegetables, creating a harmonious flavor profile. It’s a key component that ties the dish together, ensuring each bite is bursting with flavor.

Cooking Techniques

The preparation of pinakbet involves simple yet effective cooking techniques that enhance the taste and texture of the vegetables. Sautéing the onion and garlic at the beginning builds a fragrant base that sets the tone for the dish.

Simmering the vegetables in a broth infused with shrimp paste allows them to absorb the flavors while becoming tender. This method ensures that every ingredient reaches its full potential, delivering a comforting dish that warms the heart.

Serving Suggestions

Pinakbet is traditionally served warm, often accompanied by a side of steamed rice. The simplicity of the rice complements the rich flavors of the dish, making it a perfect pairing.

For an authentic Filipino meal, consider presenting the pinakbet in a rustic bowl, emphasizing its home-cooked nature. This approach invites diners to dig in and enjoy the meal as it was meant to be shared among family and friends.

Nutritional Value

Not only does pinakbet deliver on flavor, but it also offers a range of nutritional benefits. Packed with vegetables, this dish is a great source of vitamins and minerals, making it a healthy option for any meal.

Each serving contains a modest amount of calories, with a good balance of carbohydrates and protein. This makes pinakbet an excellent choice for those looking to enjoy a hearty yet nutritious dish.

Cultural Significance

Pinakbet is more than just a meal; it embodies the essence of Filipino culture. This dish reflects the agricultural roots of the Philippines, where fresh vegetables play a vital role in daily life.

Enjoyed by families across the nation, pinakbet is often prepared during gatherings and celebrations, symbolizing unity and communal dining. It stands as a testament to the rich culinary heritage of the Philippines, cherished for both its taste and tradition.

Traditional Pinakbet with Shrimp Paste

A traditional Filipino pinakbet with mixed vegetables and shrimp paste on a rustic table with rice.

This Pinakbet recipe features a variety of tender vegetables simmered in a rich broth, seasoned with shrimp paste for an authentic Filipino taste. The combination of flavors is both comforting and invigorating, ensuring you enjoy every mouthful.

Ingredients

  • 1 cup squash, diced
  • 1 cup eggplant, sliced
  • 1 cup bitter melon, sliced
  • 1 cup string beans, cut into 2-inch pieces
  • 1 medium onion, chopped
  • 2 cloves garlic, minced
  • 2 tablespoons shrimp paste (bagoong)
  • 2 cups water
  • Salt and pepper to taste
  • 2 tablespoons vegetable oil

Instructions

  1. Sauté Aromatics: Heat vegetable oil in a large pot over medium heat. Add onion and garlic, sautéing until fragrant.
  2. Add Vegetables: Stir in the squash and cook for about 5 minutes, then add eggplant, bitter melon, and string beans. Stir well.
  3. Season: Add shrimp paste and mix thoroughly. Pour in water and bring to a gentle simmer.
  4. Cook: Cover and cook for 10-15 minutes or until the vegetables are tender. Season with salt and pepper to taste.
  5. Serve: Transfer to a serving dish and enjoy warm with steamed rice.

Cook and Prep Times

  • Prep Time: 10 minutes
  • Cook Time: 20 minutes
  • Total Time: 30 minutes

Nutrition Information

  • Servings: 4 servings
  • Calories: 150kcal
  • Fat: 5g
  • Protein: 4g
  • Carbohydrates: 24g

Authentic Kare-Kare Recipe

Kare-Kare is a beloved Filipino dish that brings together a rich peanut sauce and tender oxtail in a comforting embrace. This recipe is not just a meal; it’s a culinary tradition that resonates with family gatherings and special occasions. The depth of flavor is simply unmatched, making it a favorite among many.

Imagine a plate filled with succulent oxtail, vibrant vegetables, and a luscious peanut sauce that dances on your taste buds. This dish is an explosion of textures and flavors – the creamy richness of the sauce paired with the freshness of the vegetables creates a delightful harmony.

Making Kare-Kare may sound intimidating, but with this straightforward recipe, you’ll find it surprisingly accessible. Get ready to impress your friends and family with this Filipino classic!

Understanding Kare-Kare

Kare-Kare is not just another dish; it’s an integral part of Filipino culinary heritage. This rich and flavorful meal features tender oxtail, creating a comforting experience that evokes memories of home and family gatherings. Each bowl serves as a reminder of special occasions filled with laughter and shared stories.

The key to its charm lies in the luscious peanut sauce, which envelops the oxtail and fresh vegetables, creating a delightful balance of flavors. The slight sweetness of the sauce, combined with the savory notes of the meat, makes every bite an enjoyable experience. It’s a dish that embodies the spirit of Filipino cuisine.

Ingredients that Shine

The beauty of Kare-Kare is in its simplicity and the quality of its ingredients. Oxtail is the star, but it’s complemented by a vibrant selection of vegetables including eggplant, banana heart, and string beans. This colorful medley not only enhances the dish visually but also adds various textures and nutrients.

Peanut butter and ground rice form the base of the rich sauce, contributing to its creamy consistency. Fish sauce adds a hint of umami, while chopped peanuts on top provide a delightful crunch. Served with bagoong, a fermented shrimp paste, the flavors come together to create a traditional feast.

Cooking Techniques

Creating the perfect Kare-Kare involves a few essential techniques that ensure tenderness and flavor. The initial step of boiling the oxtail helps to cleanse it, setting the stage for a clean-tasting broth. Simmering the meat slowly allows the flavors to develop fully, resulting in a tender texture that falls off the bone.

Incorporating the peanut sauce requires careful mixing to achieve the right consistency. The addition of vegetables towards the end of cooking helps maintain their vibrant colors and crunch. This method showcases the dish’s freshness while ensuring each component harmonizes beautifully.

Serving Suggestions

Presentation plays a significant role in how Kare-Kare is enjoyed. Ladling the dish into deep bowls and garnishing with chopped peanuts elevates the visual appeal. The contrasting colors of the dish against a wooden table provide a rustic charm that enhances the overall dining experience.

Pairing it with a bowl of bagoong allows each diner to customize their meal, adding a salty punch that balances the richness of the sauce. This interactive element makes eating Kare-Kare not just a meal, but a festive occasion.

Cultural Significance

Kare-Kare is more than just food; it’s a symbol of Filipino culture. Traditionally served during significant celebrations, this dish brings people together, fostering a sense of community. The act of sharing a bowl of Kare-Kare showcases generosity and hospitality, deeply rooted in Filipino values.

As families gather around the table, the dish becomes a centerpiece of conversation, laughter, and connection. The experience of enjoying Kare-Kare extends beyond the palate, resonating with cherished memories and shared moments.

Variations and Modern Takes

While the classic version of Kare-Kare remains beloved, many modern adaptations have emerged, catering to a diverse range of dietary preferences. Some variations include using vegetables as the main ingredient, appealing to vegetarians or vegans, while others may incorporate different proteins such as tripe or even seafood.

Experimenting with the ingredients provides a fresh take on this traditional dish while still honoring its roots. Whether it’s a family recipe passed down through generations or a new interpretation, Kare-Kare continues to evolve, delighting palates around the world.

Traditional Kare-Kare with a Twist

A bowl of Kare-Kare with oxtail and vegetables in peanut sauce, garnished with peanuts, alongside bagoong.

This authentic Kare-Kare features tender oxtail stewed in a velvety peanut sauce, accompanied by a colorful medley of vegetables. Each bite is a perfect balance of savory and slightly sweet, leaving a lasting impression that’s hard to forget.

Ingredients

  • 2 lbs oxtail, cut into pieces
  • 1/2 cup peanut butter
  • 1/4 cup ground rice or rice flour
  • 1 onion, chopped
  • 4 cloves garlic, minced
  • 1/2 lb eggplant, sliced
  • 1/2 lb banana heart, sliced
  • 1/2 lb string beans, trimmed
  • 4 cups beef broth
  • 2 tablespoons fish sauce
  • Salt and pepper to taste
  • Chopped peanuts and bagoong (fermented shrimp paste) for serving

Instructions

  1. Prepare the Oxtail: In a large pot, add the oxtail and cover with water. Boil for about 10 minutes, then drain and rinse. This step helps remove impurities.
  2. Simmer the Oxtail: Return the cleaned oxtail to the pot, add beef broth, onion, and garlic. Simmer for about 1.5 to 2 hours, or until the meat is tender.
  3. Make the Sauce: Once the oxtail is tender, stir in the peanut butter and ground rice, mixing until well combined. Add water if the sauce is too thick.
  4. Add Vegetables: Incorporate the sliced eggplant, banana heart, and string beans into the pot. Cook for an additional 10-15 minutes until the vegetables are tender.
  5. Season: Adjust seasoning with fish sauce, salt, and pepper to taste.
  6. Serve: Ladle the Kare-Kare into bowls and garnish with chopped peanuts. Serve hot with a side of bagoong.

Cook and Prep Times

  • Prep Time: 20 minutes
  • Cook Time: 2 hours
  • Total Time: 2 hours 20 minutes
  • Servings: 6 servings
  • Calories: 450kcal
  • Fat: 28g
  • Protein: 32g
  • Carbohydrates: 20g